
- Free of charge, no credit card required for basic package (Limit 10 Q&A)
- If you would like to upgrade to a premium package. The average price is 50 USD per 3 months, which you can contact the admin later. We do not auto-charge.
Step 1 : Let’s start installing chatbot.
** Only owner or admin can install bot. **
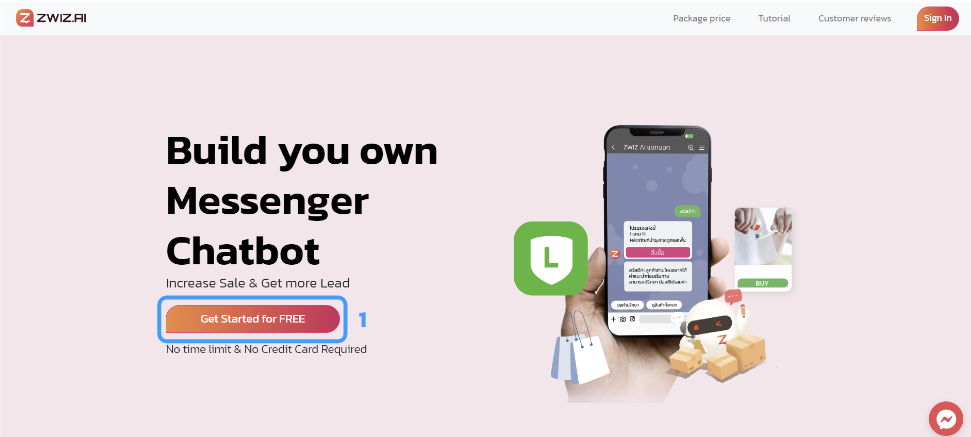
1. Go to website https://zwiz.ai/ph/sme?utm_source=PH and press the ‘Get Started for FREE’ button.
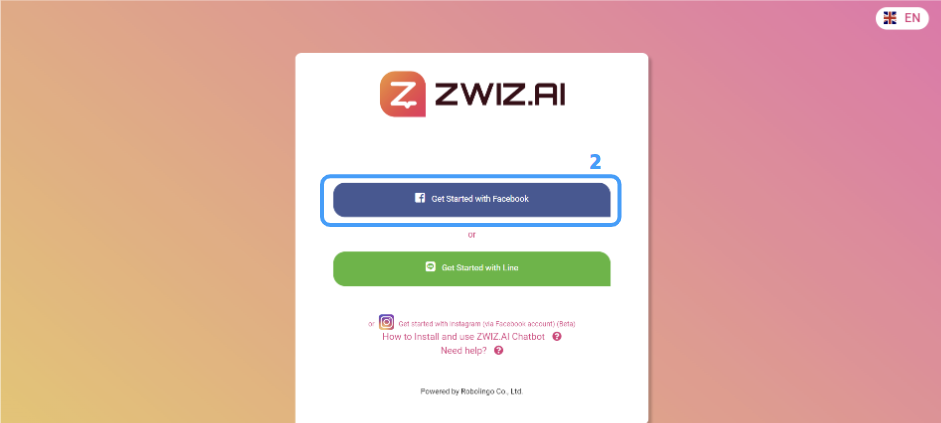
2. Press the Get Started with Facebook” button to start creating a Facebook Chatbot (and can connect to LINE as well).
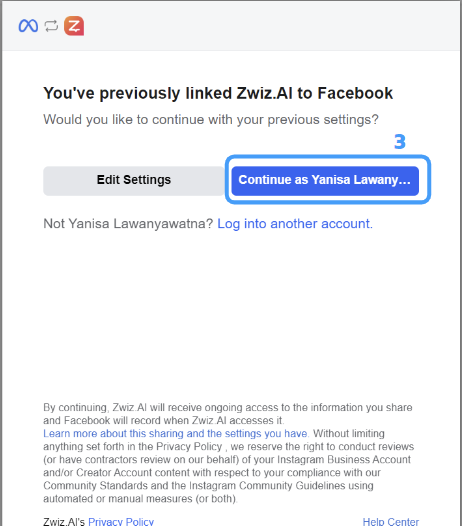
3. Press the button “Continue as…”
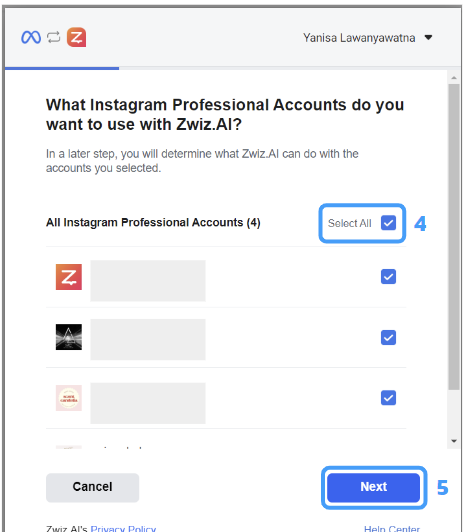
4. Choose Instagram Professional Accounts to use with Zwiz.AI (Recommend to click the “Select All” button to prevent the problem of adding the page later.)
5. After selecting all, press the “Next” button.
6. Choose Facebook Pages to use with Zwiz.AI (Recommend to click the “Select All” button to prevent the problem of adding the page later.)
7. After selecting all, press the “Next” button.
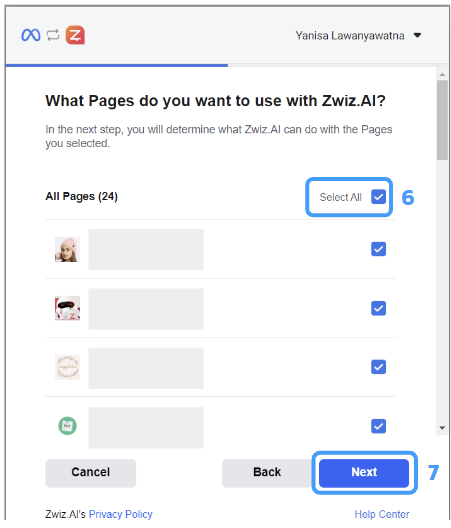
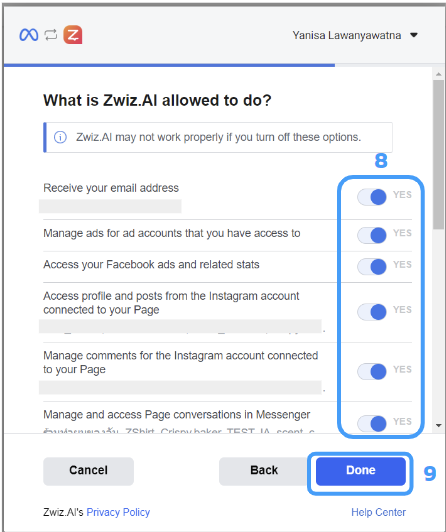
8. Turn on all permissions. (If all permissions are not allowed in this section, Ai may not work properly.)
9. Press the “Done” button.
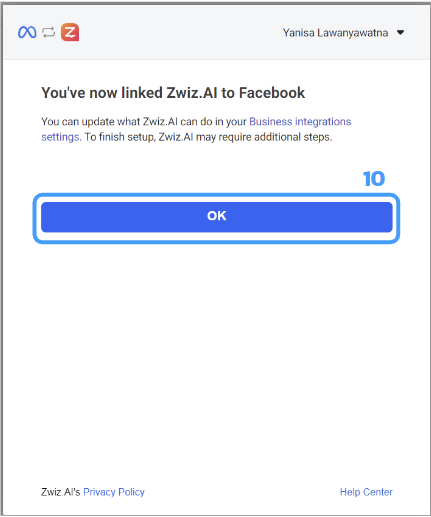
10. The chatbot has been linked with Facebook successfully. Press the “OK” button.
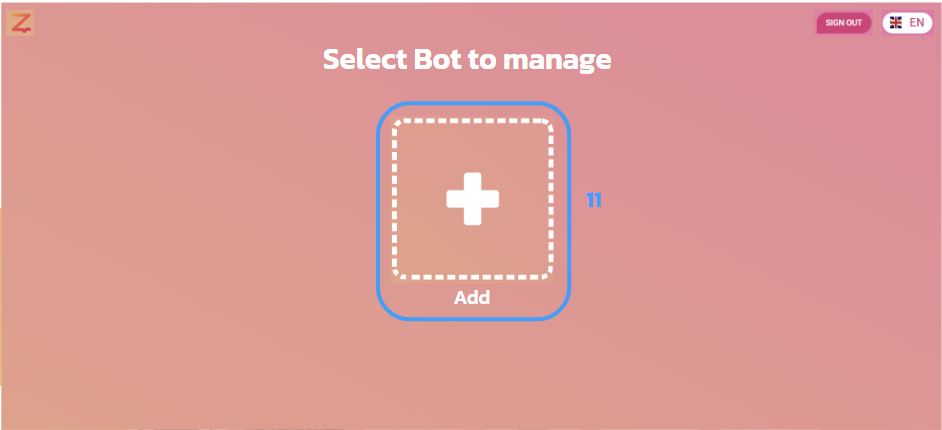
11. Select Bot to manage >> Click +Add
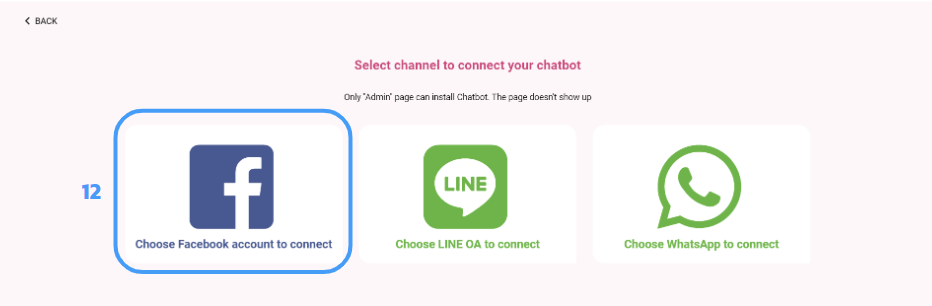
12. Select channel to connect your chatbot. (Recommend to choose Facebook account for first time.)
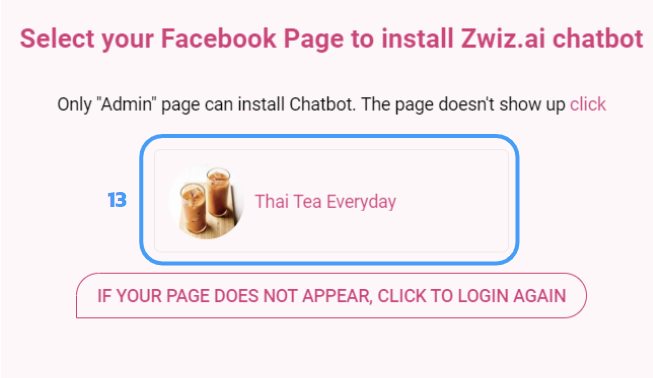
** Only “Admin” page can install Chatbot. **
13. Select your Facebook Page to install Zwiz.AI chatbot.
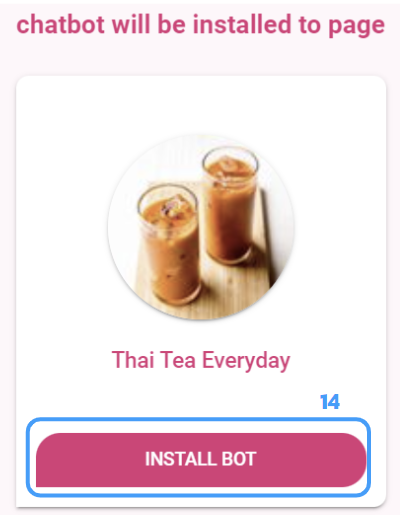
14. Chatbot will be installed to the page that you selected. Click the “INSTALL BOT” Button.
Step 2 : 3-step welcome!
In this part, there are 3 main steps : Welcome Message, Choice, and Redeem Code.
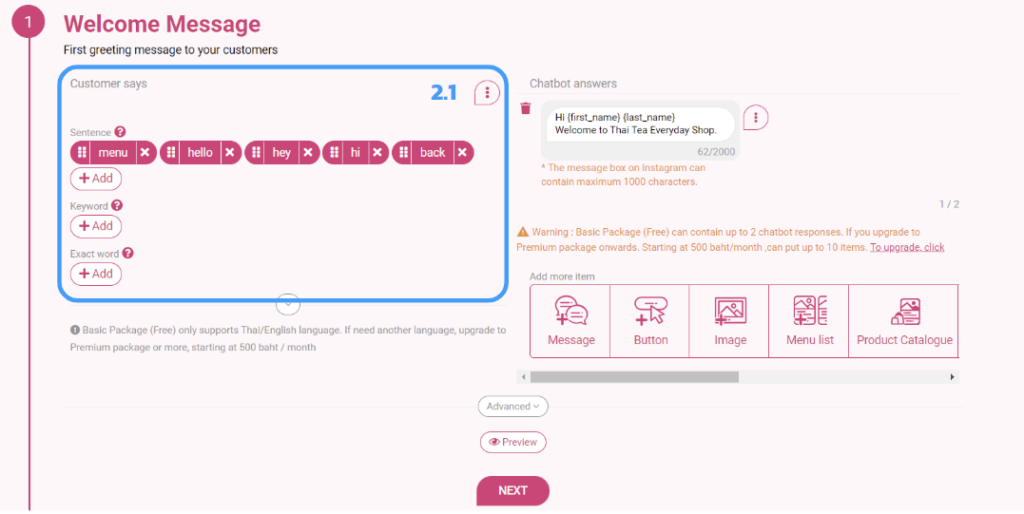
2.1 Welcome Message : Setting up the messages that customers ask frequently. (Left side)
Click to show/hide
Difference of sentence//keyword//exact wrod
-Sentences can be typed as long sentences.
-Keywords are used with short words. If there is this word in the sentence, the bot will answer according to the set answer.
-Exact words use with 100% exact synonyms. There must be only one word in the sentence.
2.2 Welcome Message : Setting up a message for the store to answer customer questions. (Right side)
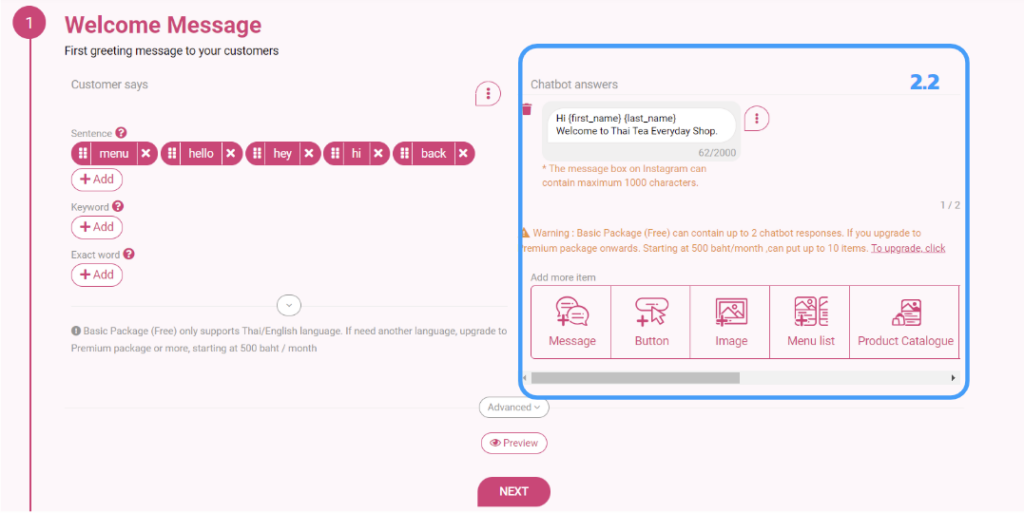
(The answer for welcome message can set after this step, so you can press “NEXT” to skip to the next step)
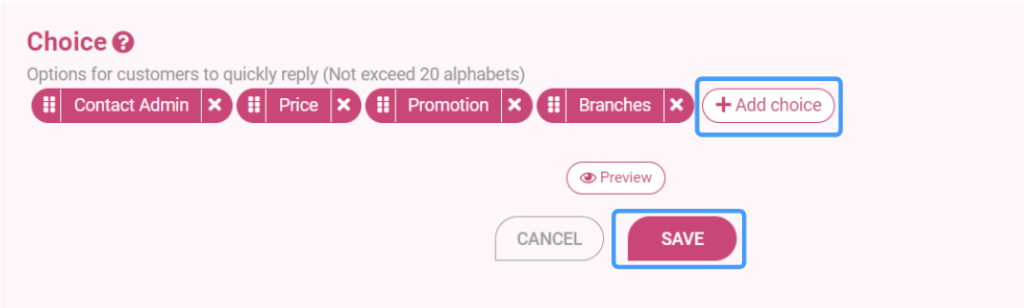
2.3 Choice : Choice is the guideline words for customers. So customers don’t have to type but can easily press “choice” to get the faster answer.
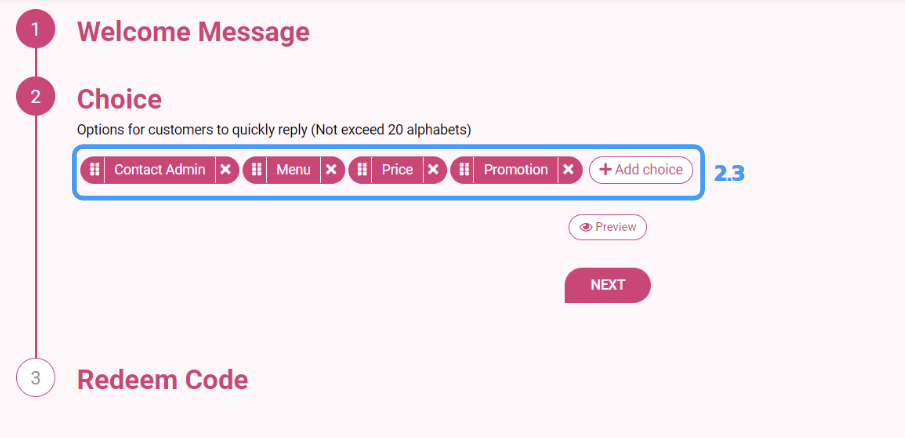
Press the “Add choice” button, type a common word as an option for the person who messaged you.
(Limited to 20 characters per choice word)
When you’re done, press “NEXT” to skip to the next step
2.4 Redeem Code : Fill in if you have “redeem or support code” from ZWIZ.AI’s official partners.
If you got “code” from ZWIZ.AI’s partner, you can fill in and press “Activate”
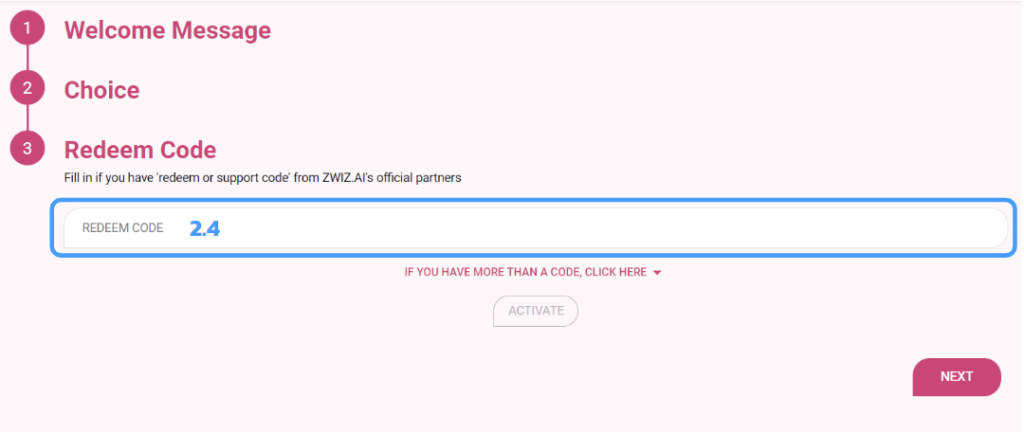
But if you don’t have a redeem or support code, you can press the “NEXT” button.

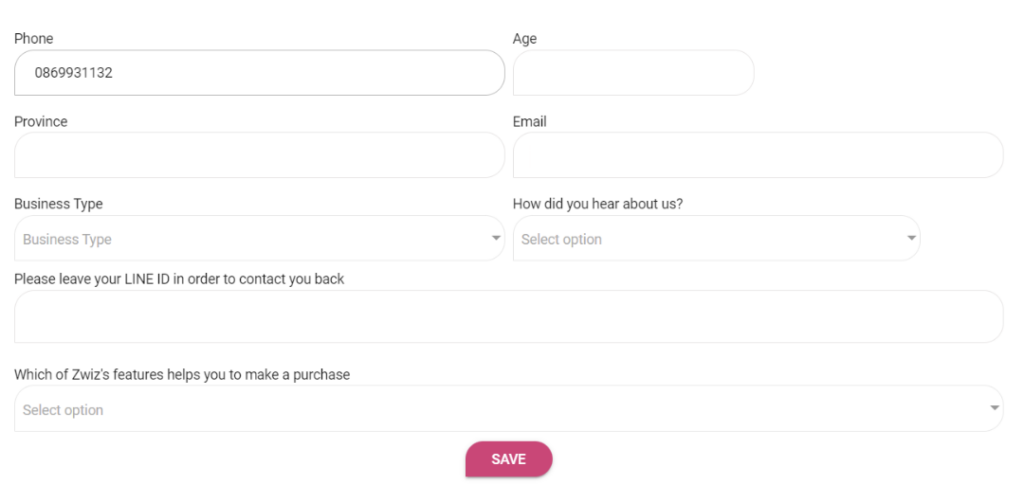
- Fill your Phone Number and Email
- Choose the choise, Yes or No, to get more info via online session with ZWIZ.AI team.
- Check the box to accept Term & Conditions and Privacy Policy
- Press the “NEXT” button
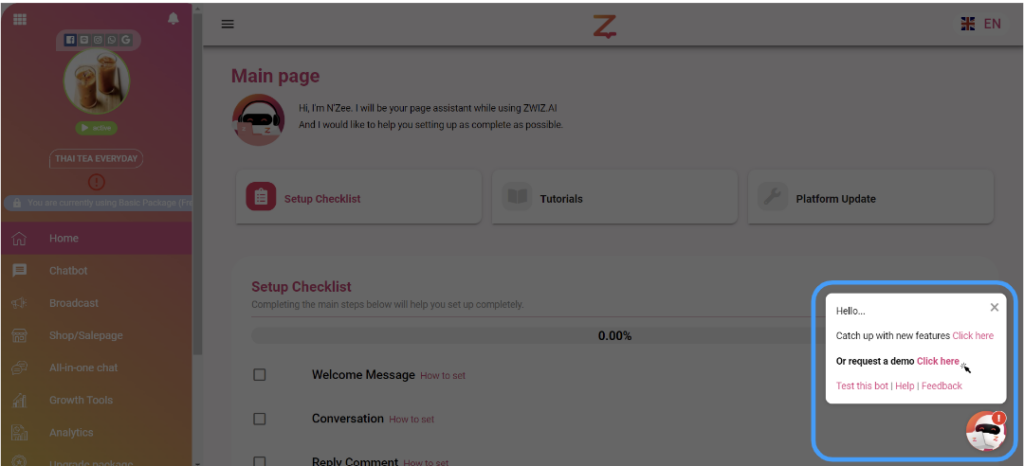
Then, you’ll come into the main page and see “N’Zee” ZWIZ.AI’s Mascot on the right down corner with a small pop-up window.
You can caych up with new features, request a demo, test bot, send help, or send feedback here.
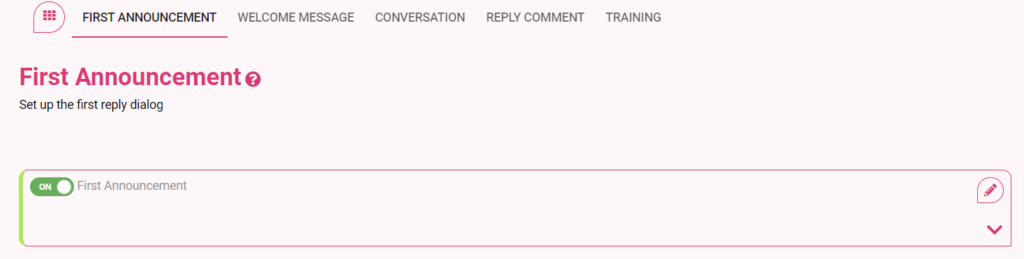
Step 3 : First Announcement
Click to show/hide
First Announcement is the feature that you can set the chatbot answers and set date & time for announcement that you want your customer to know for the first time they start the chat. The First Announcement will appear only 1 time when customer start the chat on time you set.
🌟How to Set Up?
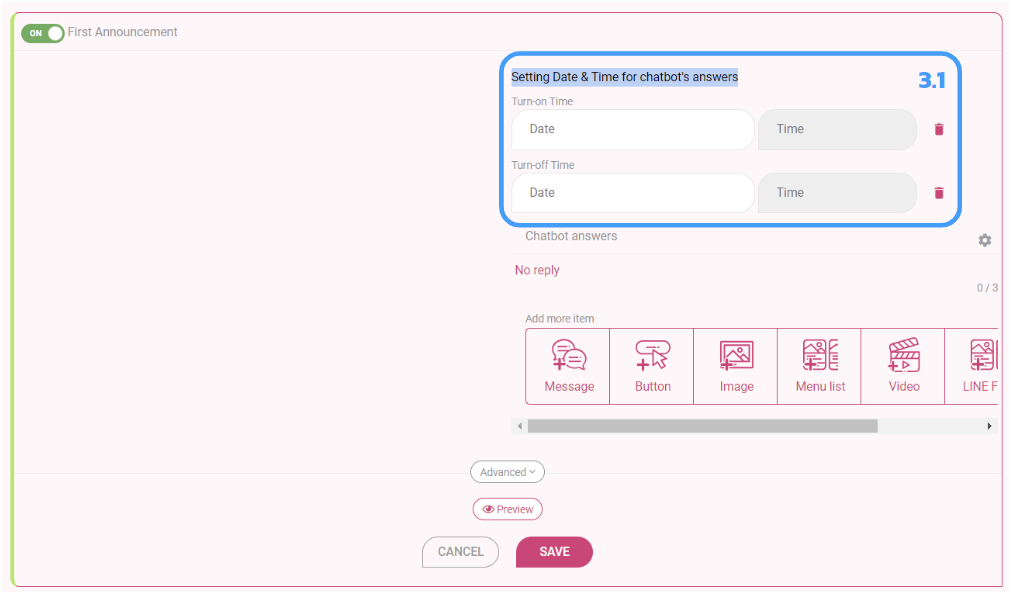
Step 3.1 : Setting Date & Time for chatbot’s answers. Including Turn-on Time and Turn-off Time.
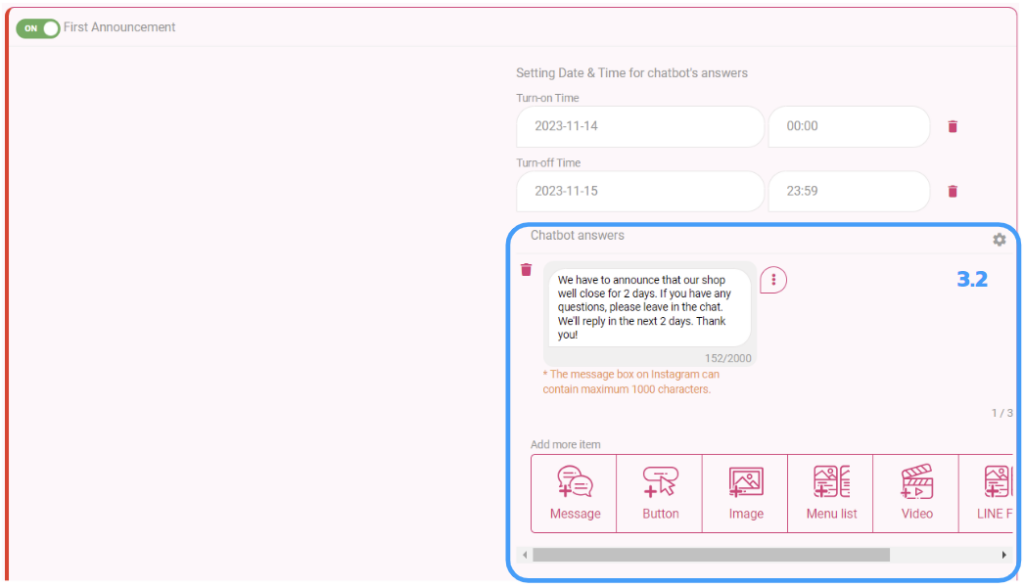
Step 3.2 : Setting Chatbot answers. You can add up to 3 items of the announcement. Such as Message, Button, Image, Menu list, Video, etc. (We’ll explain about each item in the Conversation Topic.)
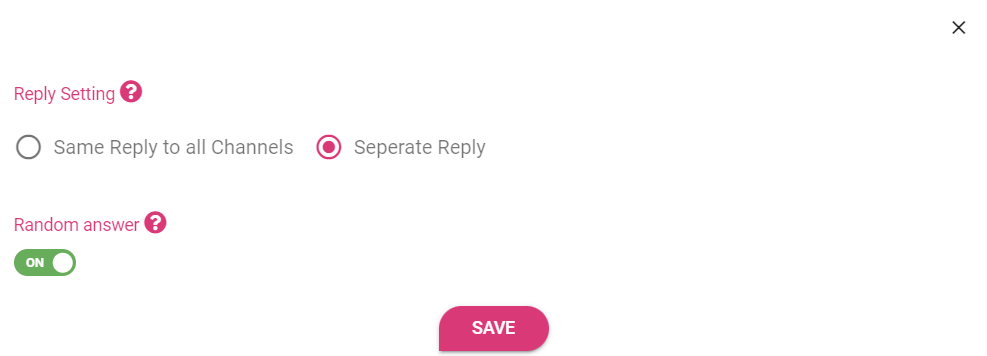
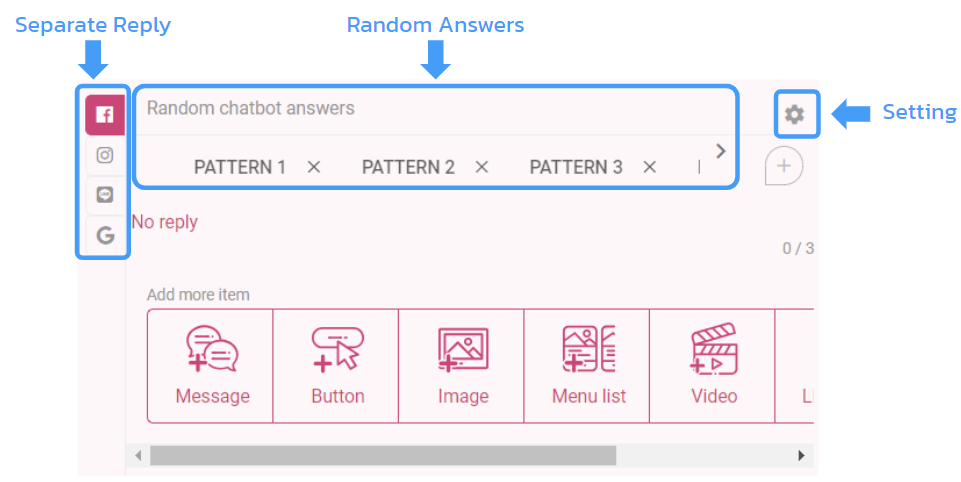
*You can set the different Reply for separate platforms – Facebook, Instagram, LINE, Google, Whatsapp.
*You can choose up to 5 random answer formats. The system will randomly answer the customer’s answer.
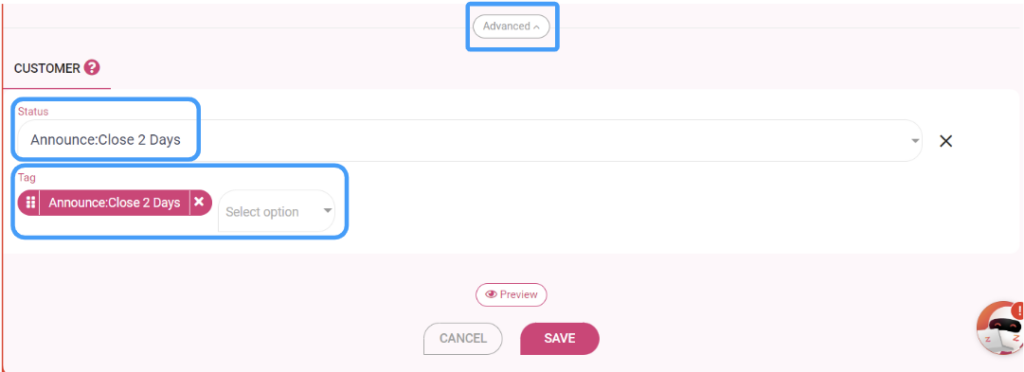
Step 3.3 : Setting Tag & Status : You can add Tag & Status to the First Announcement. It’ll help you to know that who receives this announcement
Step 4 : Welcome Message
Click to show/hide
🌟How to Set Up?
There are 3 main steps
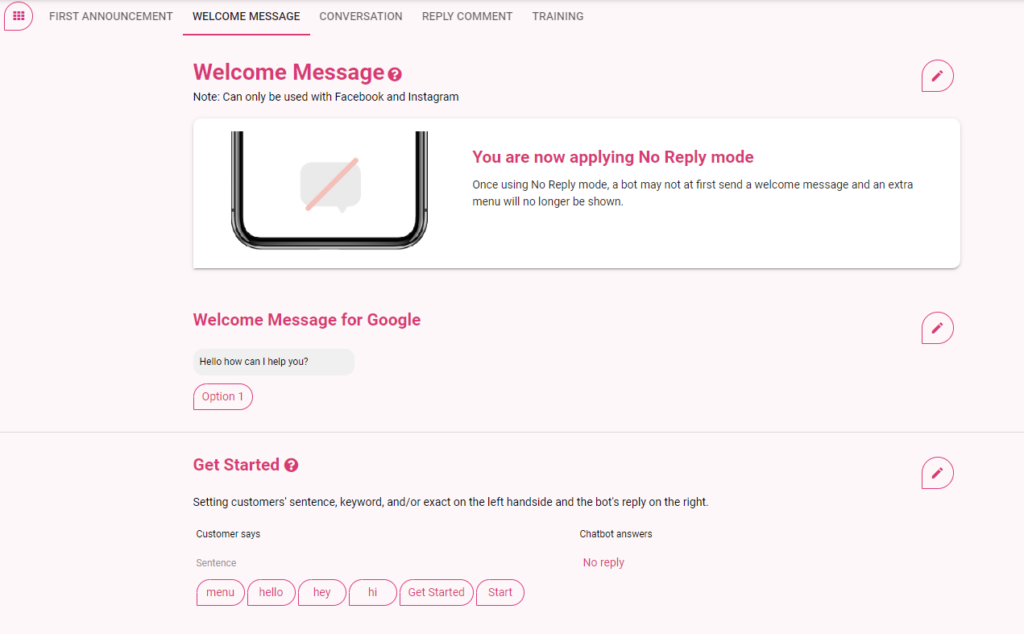
Step 4.1 : Welcome Message -> Choose the template you want to show.
*Can only be used with Facebook and Instagram.
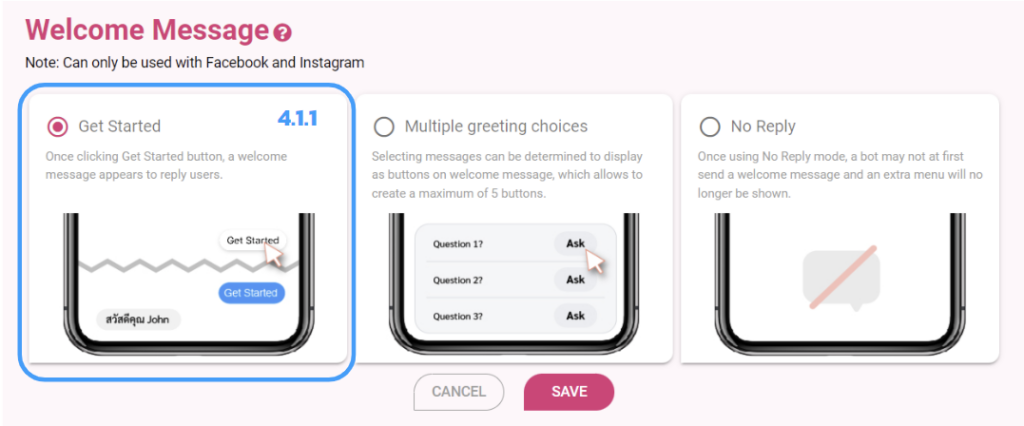
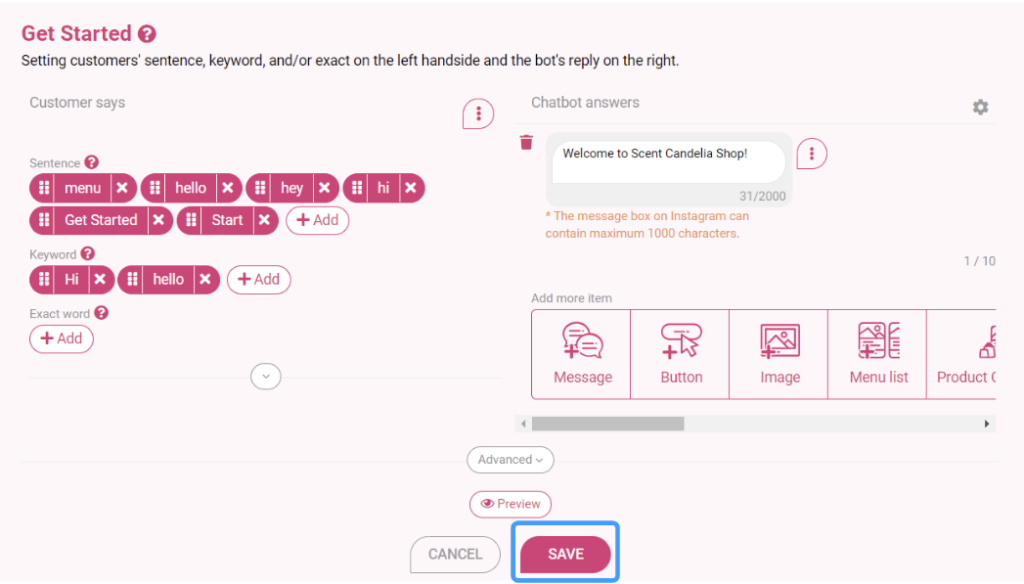
4.1.1 Get Started : Once clicking Get Started button, a welcome message appears to reply user.
- Then press “SAVE”.
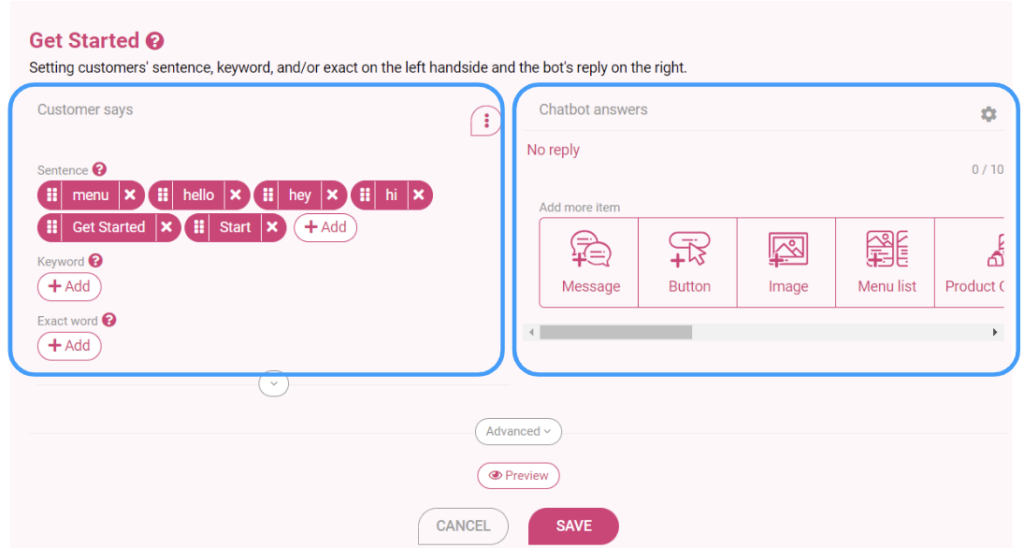
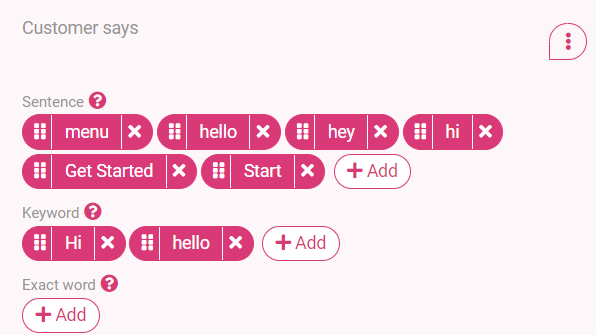
- Setting customer’s sentence, keyword, and/or exact word on the left.
- Setting the bot’s reply on the right.
Difference of sentence//keyword//exact wrod
-Sentences can be typed as long sentences.
-Keywords are used with short words. If there is this word in the sentence, the bot will answer according to the set answer.
-Exact words use with 100% exact synonyms. There must be only one word in the sentence.
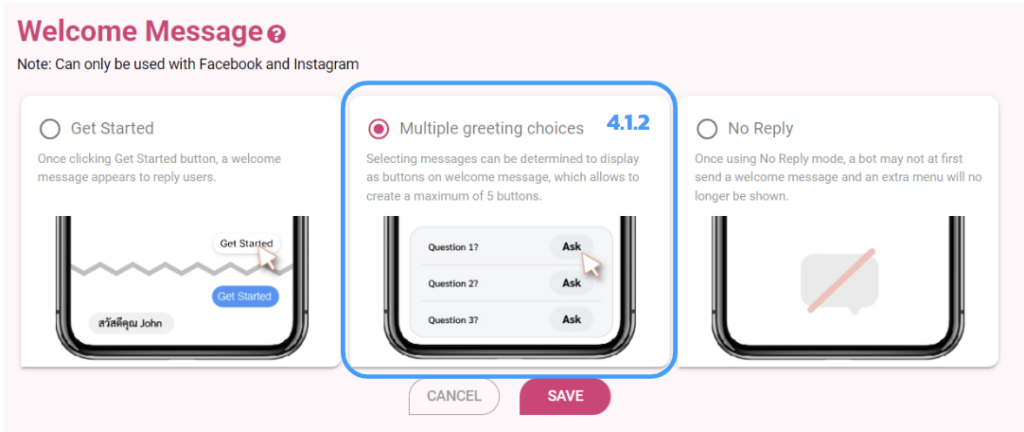
4.1.2 Multiple greeting choices : Selecting messages can be determined to display as buttons on welcome messages, which allows to create a maximum of 5 buttons.
- Then press “SAVE”.
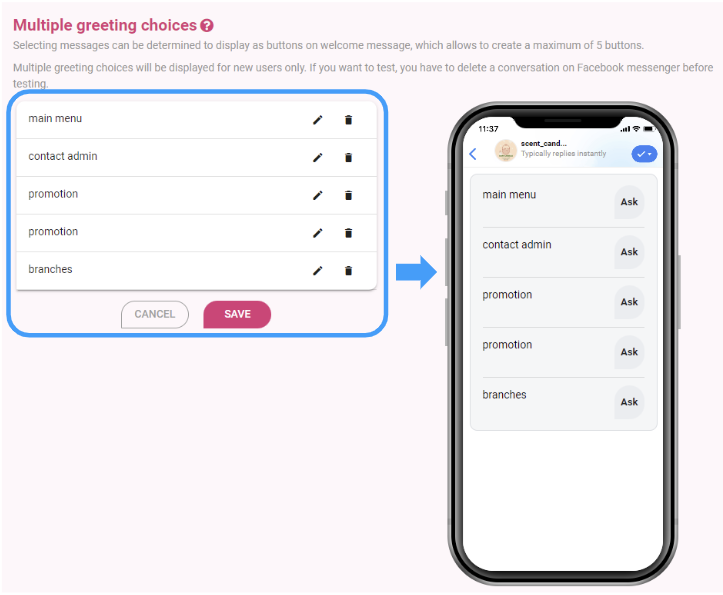
- Selecting messages can be determined to diaplay as buttons on welcome message, which allows to create a maximum of 5 buttons.
- Multiple greeting choices will be displayed for new users only.
- If you want to test, you have to delete a conversation on Facebook messenger before testing.
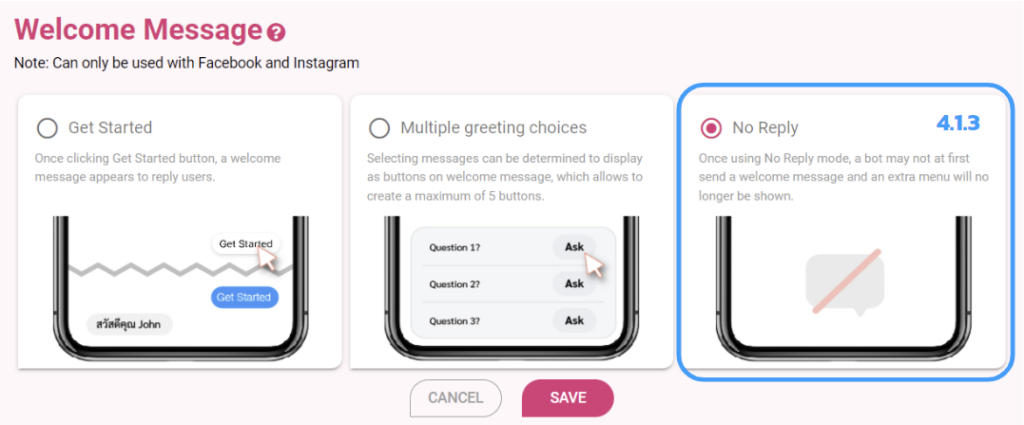
4.1.3 No Reply : Once using No Reply mode, a bot may not at first send a welcome message and an extra menu will no longer be shown.
- Then press “SAVE”.
Step 4.2 : Get Started
4.2.1 Setting up the messages that customers ask frequently. (Left side)
Difference of sentence//keyword//exact wrod
-Sentences can be typed as long sentences.
-Keywords are used with short words. If there is this word in the sentence, the bot will answer according to the set answer.
-Exact words use with 100% exact synonyms. There must be only one word in the sentence.
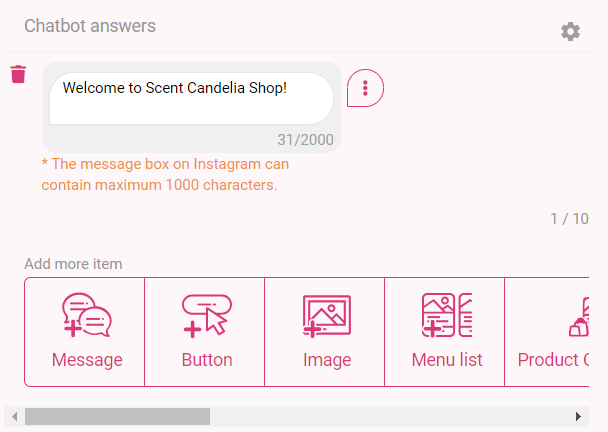
4.2.2 Setting up a message for the store to answer customer questions. (right side)
- You can set up to 10 items in Welcome Message.
(We’ll explain about each item in the Conversation Topic.)
- Then press “SAVE”.
4.2.3 Make a Choice
- Choice is the guideline words for customers. So customers don’t have to type but can easily press “choice” to get the faster answer.
- Press the “Add choice” button, type a common word as an option for the person who messaged you. (Limited to 20 characters per choice word and maximum 10 choices)
- Then press “SAVE”.
Step 5 : Conversation
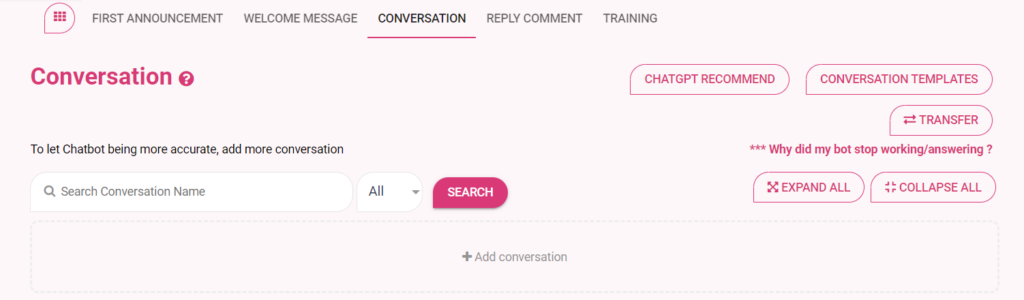
Click to show/hide
🌟How to Set Up?
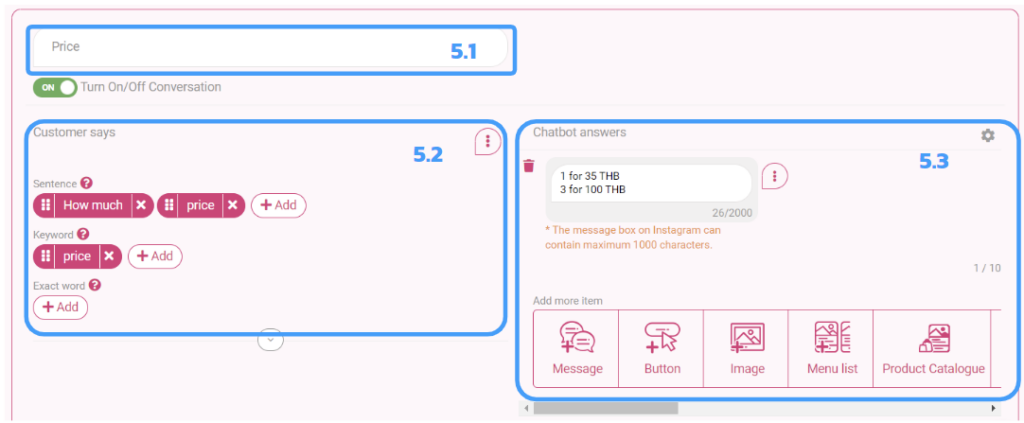
5.1 Name the topic.
5.2 Put the words that the customer will ask on the left side.
5.3 Create the desired chatbot response.
5.3.1 Message
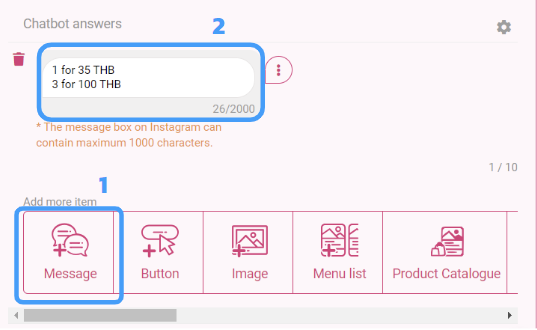
- Add item “Message”.
- Type the message you want to reply in the blank. “Chatbot answers” are free (up to 2000 characters).
5.3.2 Button
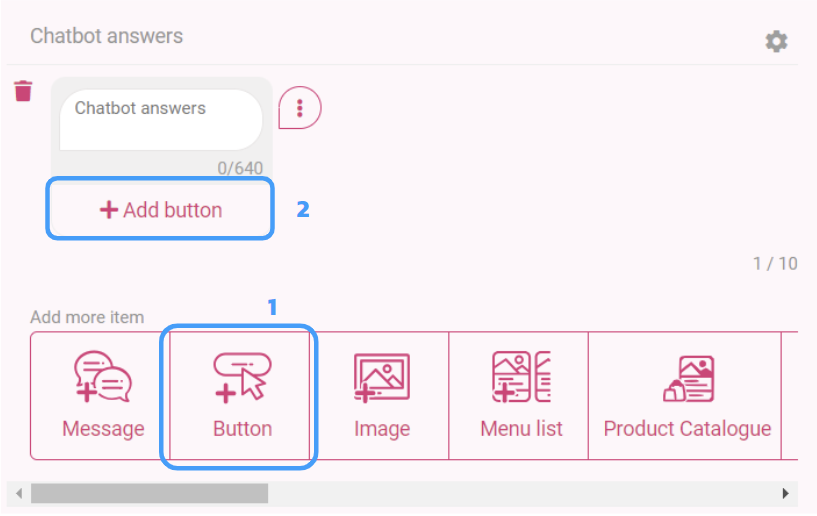
- Add item “Button”
- Press the “+Add button”
- When you press the “+Add button”, there will be 8 styles to choose from.
Button Style 1 : Link
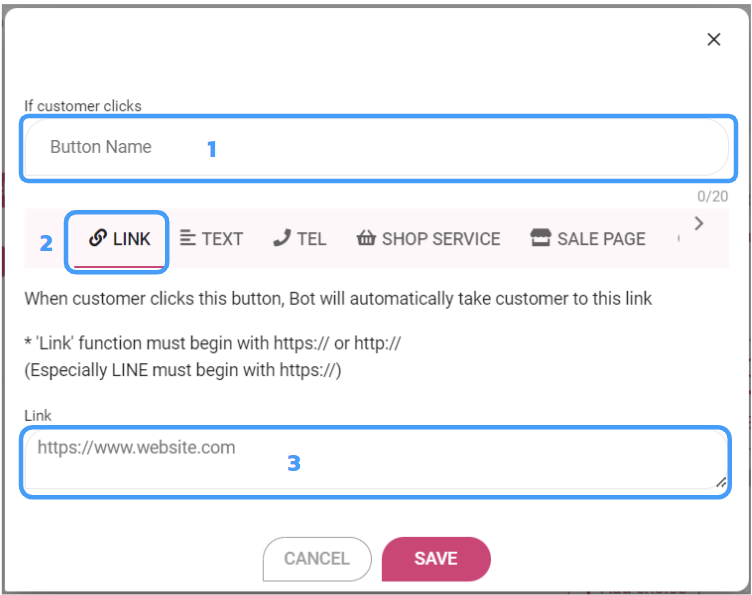
- Name the button.
- Enter the desired link. It can be either one that starts with https:// or http://, otherwise it cannot be used. We would recommend https:// as it can support both platforms. both facebook and line.
- press “SAVE”.
Button Style 2 : Text
When the customer presses this button, users will need to set up a Conversation page to see what the bot responds to.
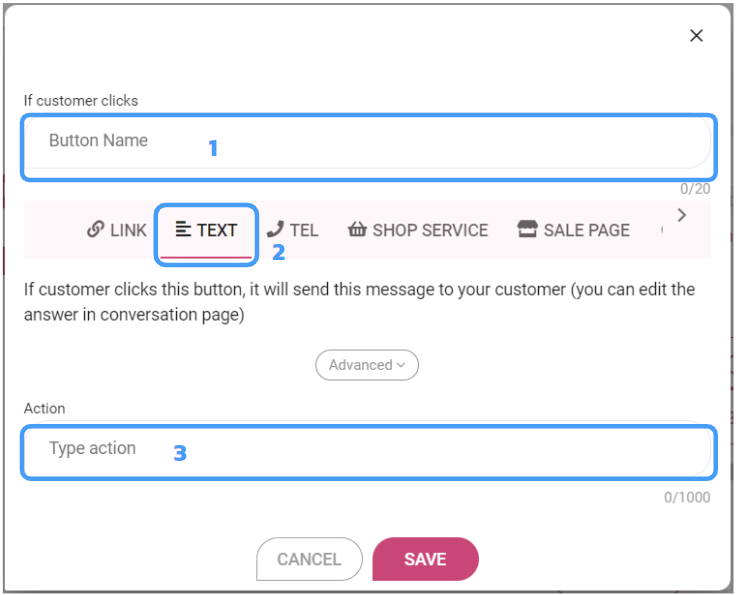
- Name the button.
- Take the button name that has been set. Go to settings in the conversation section on the left side, Frequently asked questions from customers.
- Press “SAVE”.
**Every time you type a message, create a push button, text, you need to set the answer of the bot in the conversation page.
Button Style 3 : Call
When the customer presses this button, the system will automatically call the number that the user has entered. This means that customers must use a mobile phone to connect only.
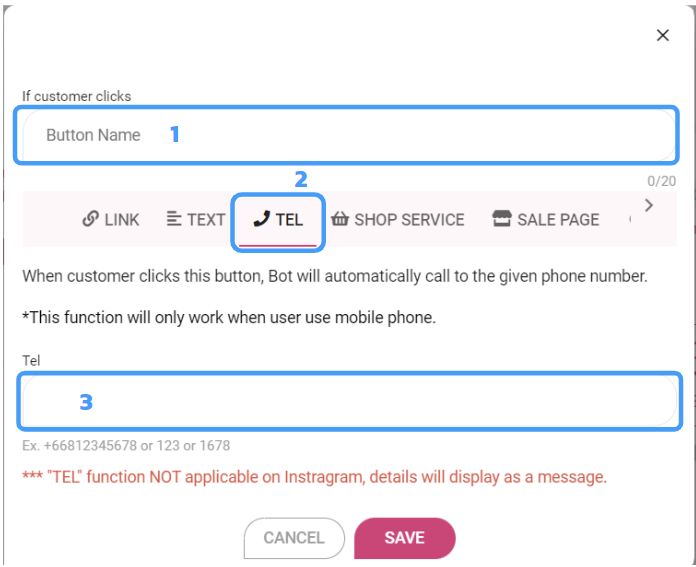
- Name the button.
- Select the country code.
- Enter your phone number.
- Press “SAVE”.
Button Style 4 : Shop Service
In the event that the user has a product that is included in the Shop Service, which is one of the features of ZWIZ.AI, when the customer presses this button, the system will link to the one-stop shop service page. Users can also choose to link directly to various product categories.
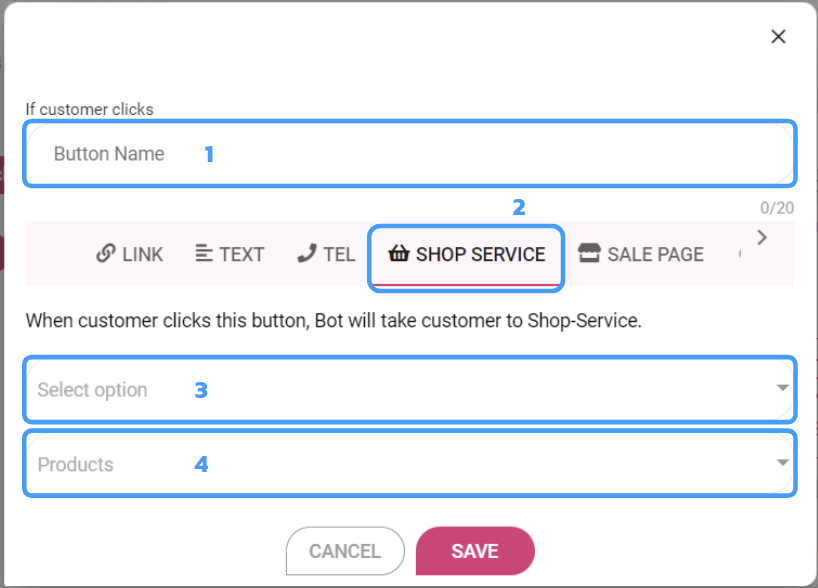
- Name the button.
- Select a product category in Shop Service.
- Select a specific product in Shop Service.
- Press “SAVE”.
Button Style 5 : Sale Page
In the event that the user has a product that is included in the Sale Page, which is one of the features of ZWIZ.AI, when the customer presses this button. The system will link to Sale Page. Users can also choose to link directly to various product categories.
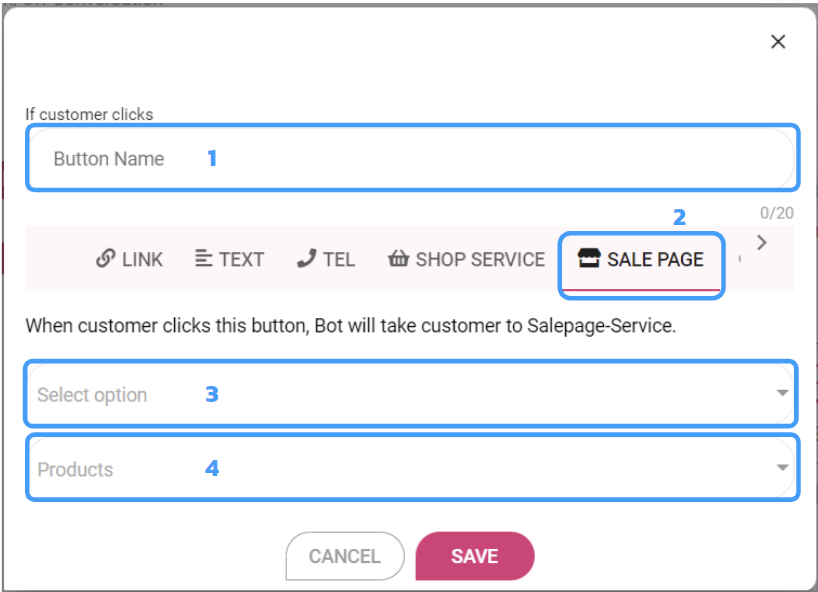
- Name the button.
- Select a product category in Sale Page.
- Select a specific product in Sale Page.
- Press “SAVE”.
Button Style 6 : Broadcast
If you want to use Marketing Broadcast, you can send the button to your customers to subscribe or unsubscribe broadcasting from your page.
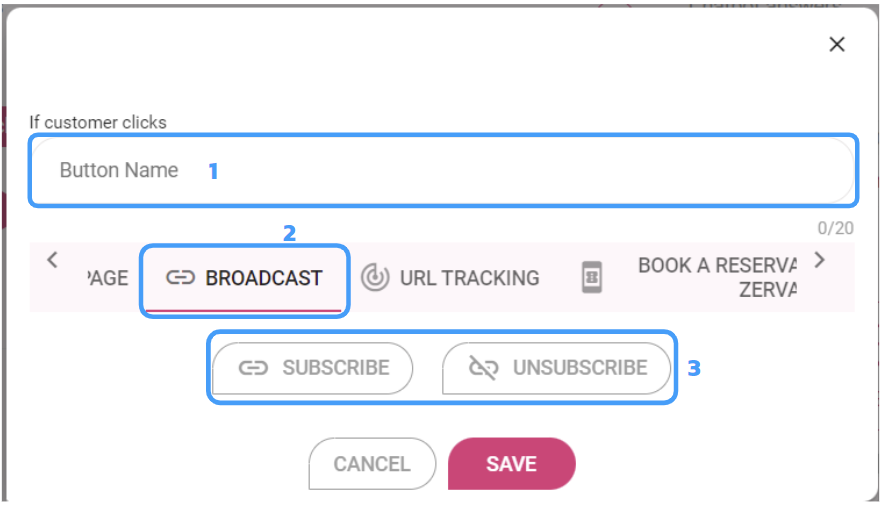
- Name the button.
- Choose Subscribe or Unsubscribe button.
- Press “SAVE”.
Button Style 7 : URL Tracking
This feature will lead the custimers to the landing page or website and track the value that you set.

- Name the button.
- Enter the Title. Ex. Shopee
- Enter the Value. Ex. 1
- Enter the desired link. Ex. htyps://shopee.com/xxxx
- Press “SAVE”.
Button Style 8 : Book a reservation wuth ZERVA
ZERVA is a Booking System for businesses and services. You can try for free HERE.
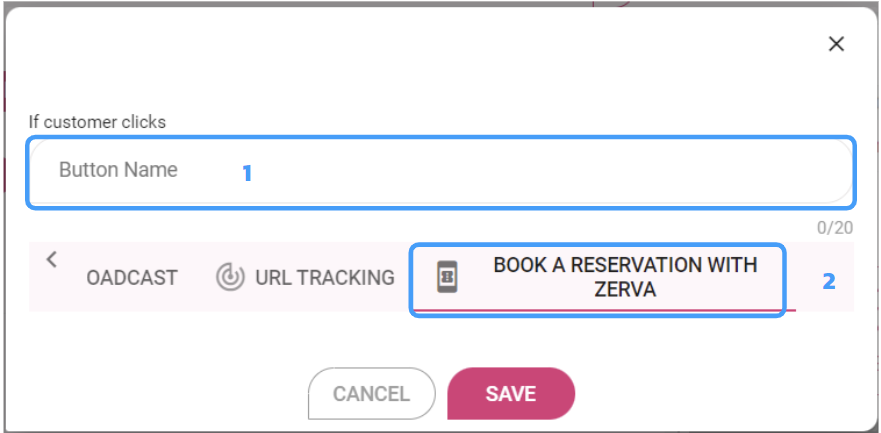
- Name the button.
- Press “SAVE”.
5.3.3 Image
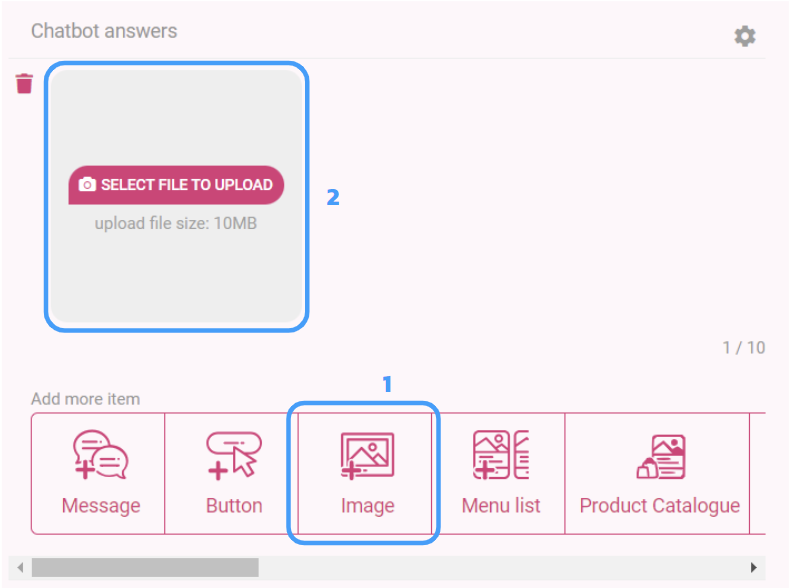
- Add item “Image”.
- Select image file to upload. (Square is recommended)
5.3.4 Menu List
It’s a layout that combines text, buttons, and images together + scrollable
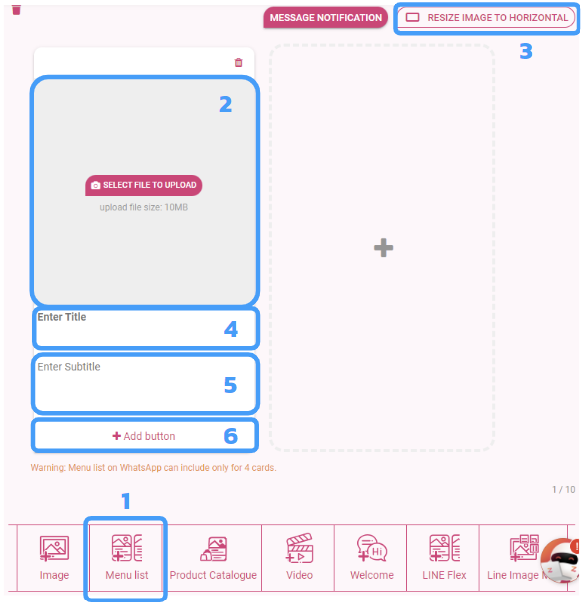
- Add item “menu list”.-
- Click “Select file to upload” (size not more than 10 MB)
- Can change the image size to vertical 1:1 or square format. But it can change the image to landscape as well. where the image size is 1:1.61)
- Type a topic in the “Enter Title” box. This area will show in dark text (not more than 80 characters).
- Type a subtitle in the box. “Enter Subtitle” This area will show in light-colored text (no more than 80 characters).
- Press “+Add button” to create a push button.
Note : ** A maximum of 10 menu items can be added.
** If “+Add button” is Text (text), must always set the answer of the bot on the Conversation page.
5.3.5 Product Catalogue
If you have products in Shop Service, you can show products in chat by using this item.
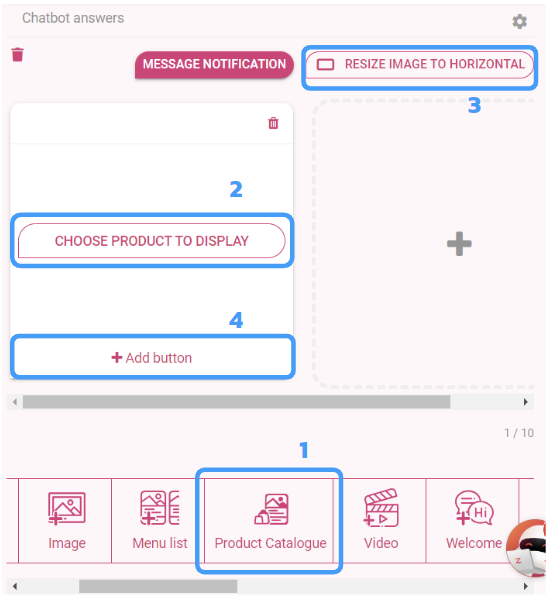
- Add item “Product Catalogue”.
- Click “Choose Product to display”.
- Select products in Shop Service that you want to show. Then, The Product image and description will show.
- +Add button. (8 Styles)
- You can add Product Catalogue up to 10 catalogues.
5.3.6 Meta Pay
Meta Pay is the payment gateway on Facebook that allow you to pay in chat.
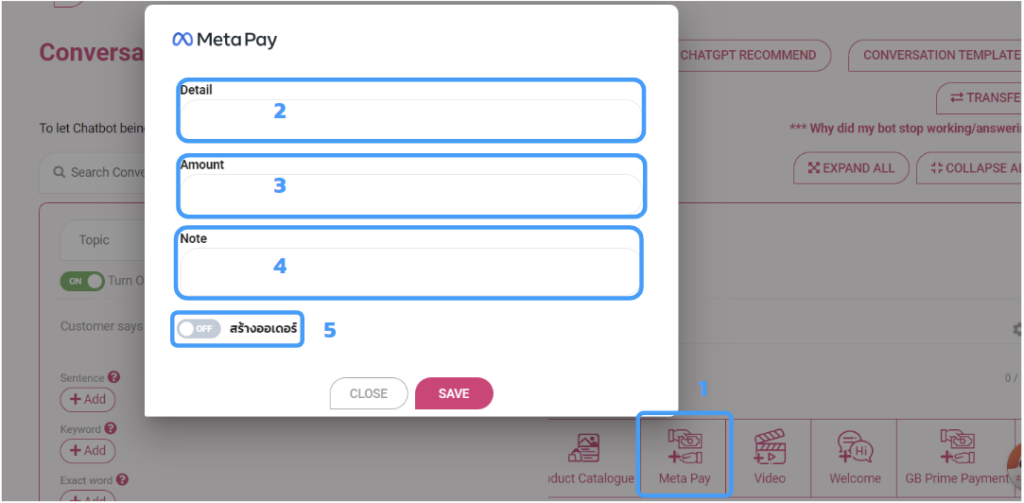
- Add item “Meta Pay”.
- Enter the Datail, Amount, and Note.
- Turn toggle ON to create order.
- Press “SAVE”.
This is the result.
5.3.7 Video
You can select Video from your Facebook or copy video link and paste.
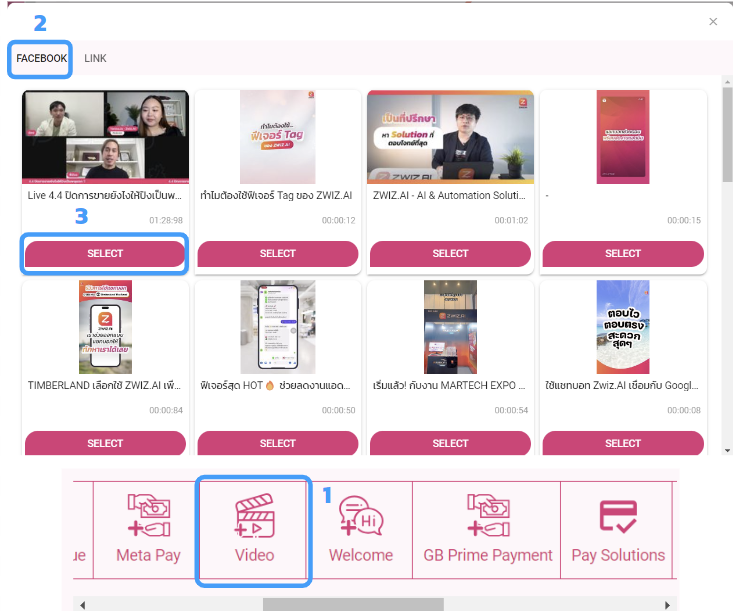
- Add item “Video”.
- Click “Facebook”.
- Select Video you want.
Link
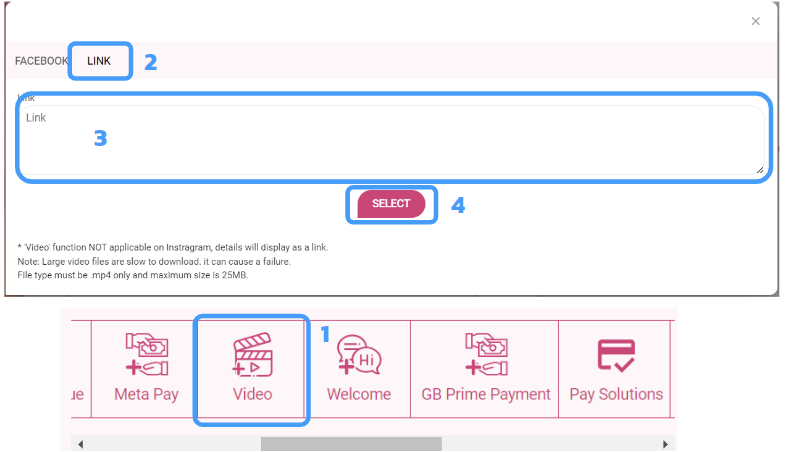
- Add item “Video”.
- Click “Link”.
- Enter Video Link in the blank.
- Press “Select”.
5.3.8 Welcome
This item will automatically show the welcome message uou set in step 4.
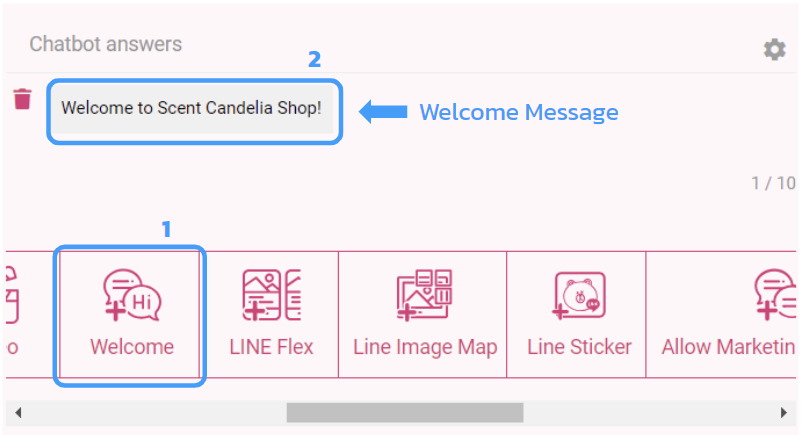
- Add item “Welcome”.
- the Welcome Message will show.
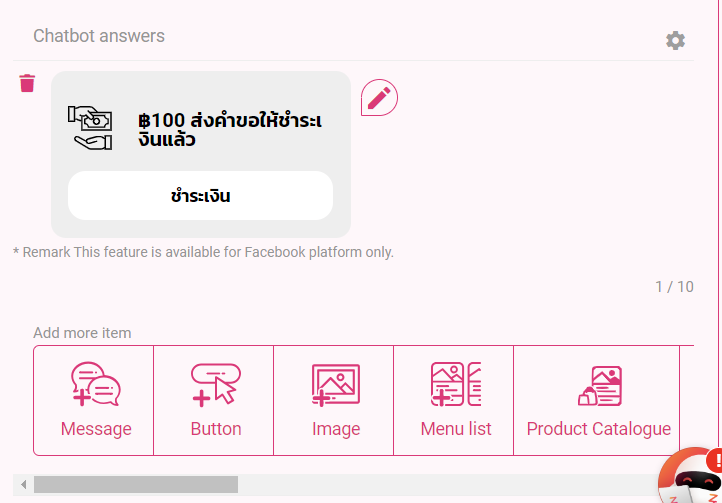
5.3.9 GB Prime Payment
If you’re using GB Prime Payment, We recommended this item.
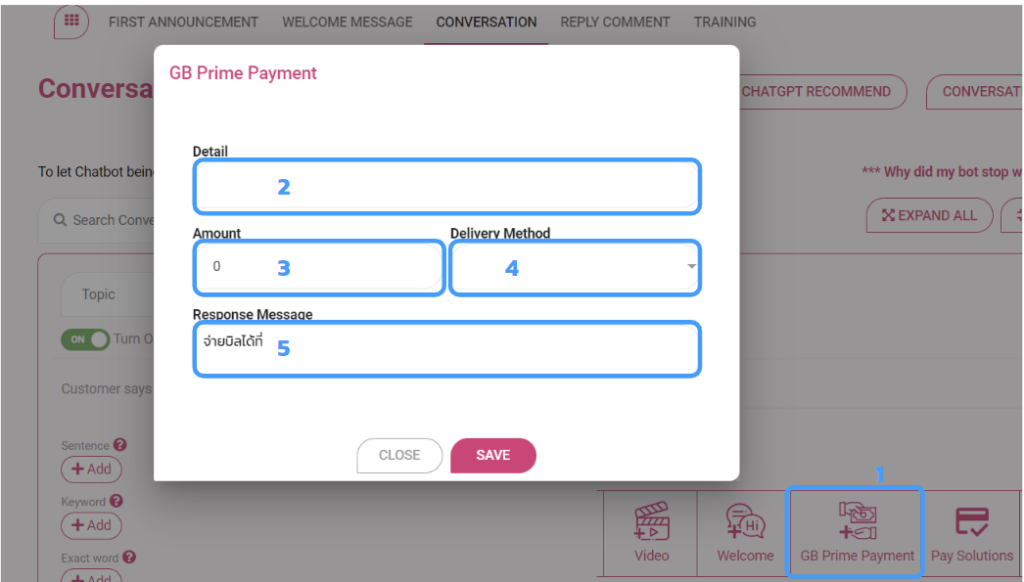
- Add item “GB Prime Payment”.
- Enter Detail.
- Enter Amount.
- Choose Delivery Method.
- Enter Response Message.
- Press “SAVE”.
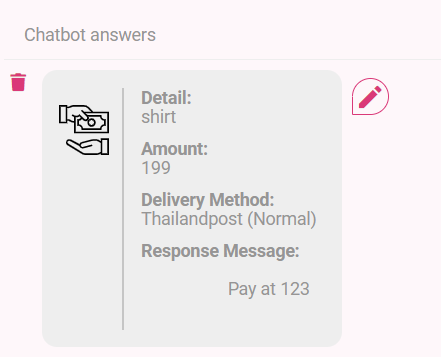
This is the result.
5.3.10 Pay Solutions
You can connect to Pay Solutions Payment and use this item.
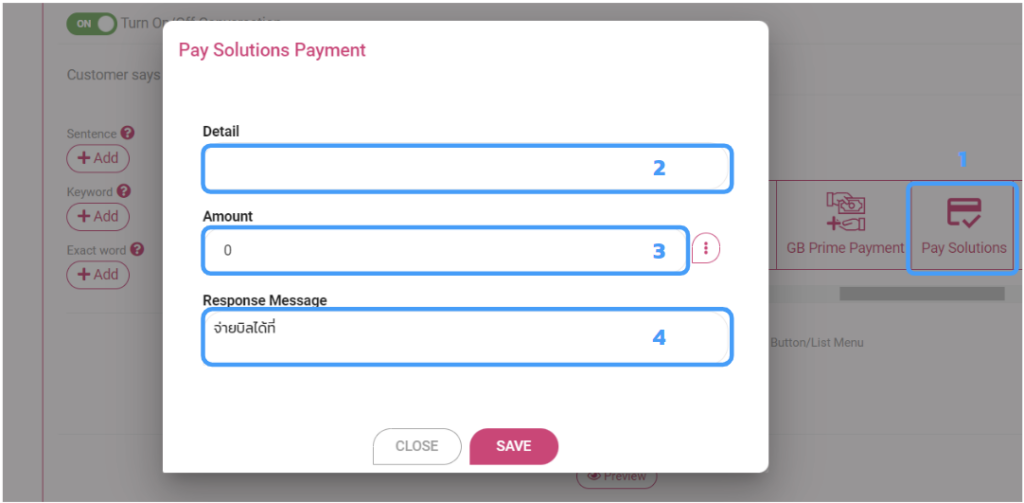
- Add item “Pay Solutions”.
- Enter Detail.
- Enter Amount.
- Enter Response Message.
- Press “SAVE”.
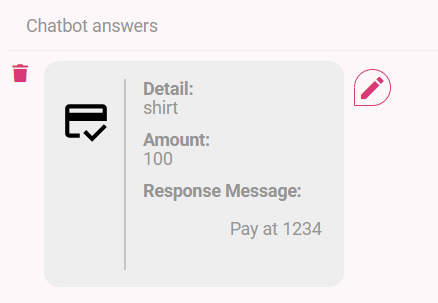
This is the result.
5.3.11 Add/Remove to cart
When the customers send you a message that they want to buy a product, bot can automatically reply the order summary to the customers.
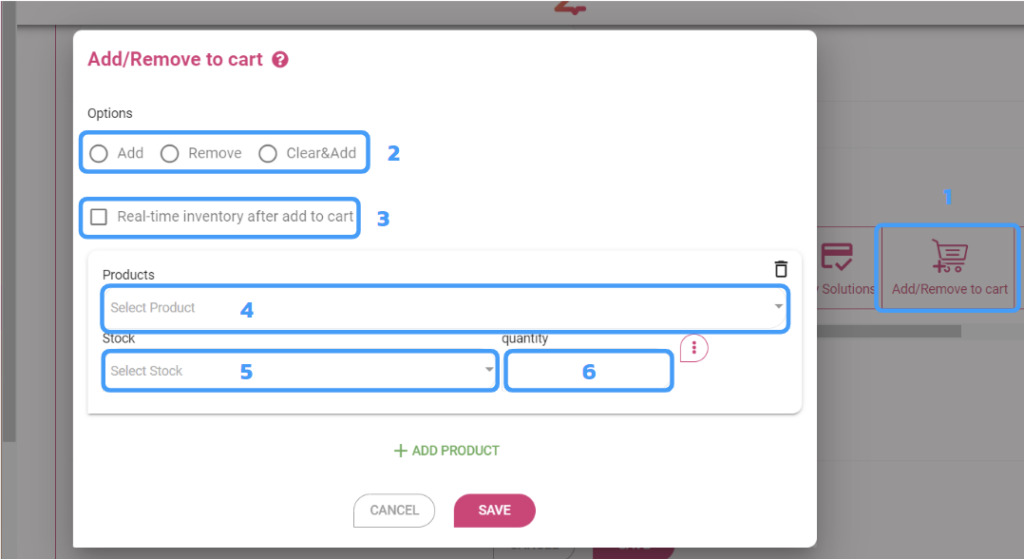
- Add item “Add/Remove to cart”.
- Select options : Add / Remove / Clear&Add.
- Check the box if you want the real-time inventory after add to cart.
- Select Product (only in Shop Service).
- Select Stock.
- Enter Quantity.
- Press “SAVE”.
This is the result.

5.3.12 LINE Flex
If you have LINE OA and want to create LINE Flex, you can use Flex message simulator on https://developers.line.biz/console/fx/ and copy JSON Code.
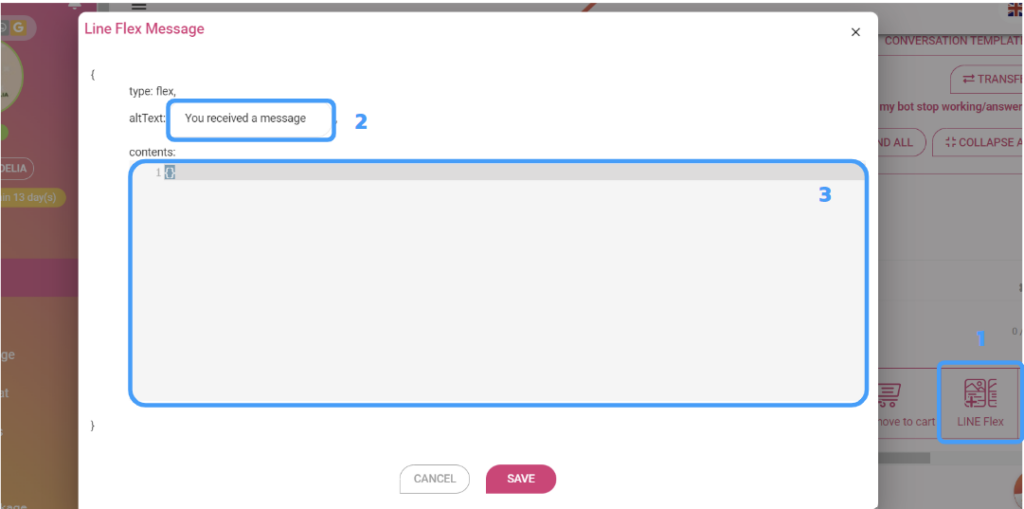
- Add item “LINE Flex”.
- Enter alt Text.
- Paste JSON Code in the box.
- Press “SAVE”.
5.3.12 LINE Image Map
You can insert link in the image by using LINE Image Map.
Case 1 : No Link URL
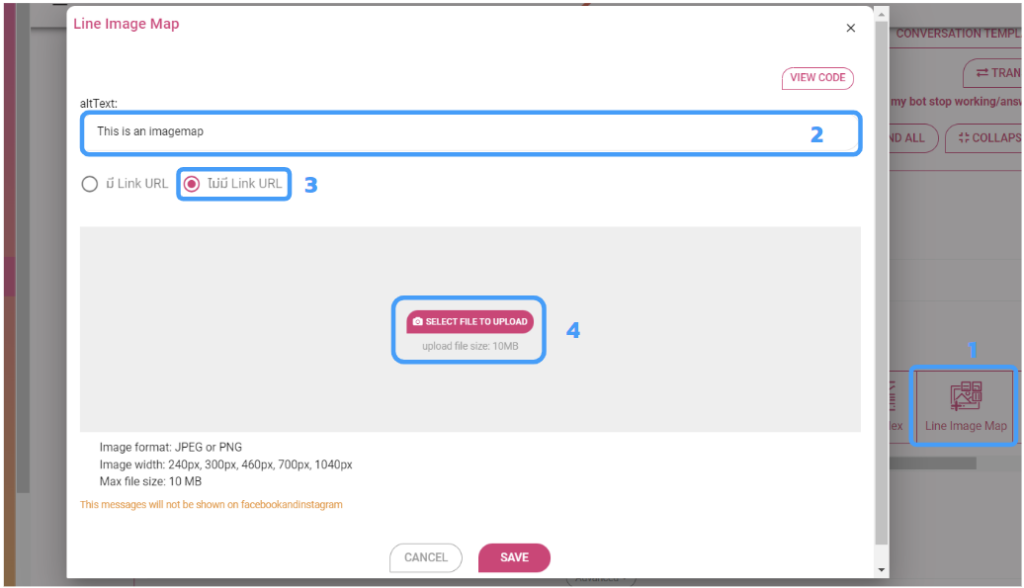
- Add item “LINE Image Map”.
- Enter Alt Text.
- Choose No Link URL
- Select File to Upload
- Press “SAVE”.
Case 1 : Have Link URL
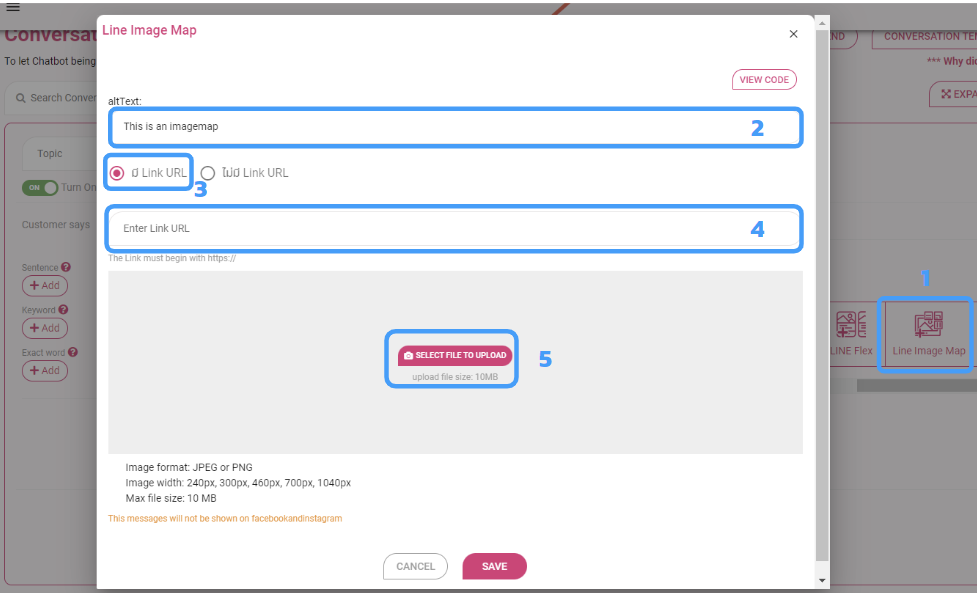
- Add item “LINE Image Map”.
- Enter Alt Text.
- Choose Have Link URL.
- Enter Link URL.
- Select File to Upload.
- Press “SAVE”.
5.3.13 LINE Sticker
You can reply your customer in LINE OA with LINE Sticker!
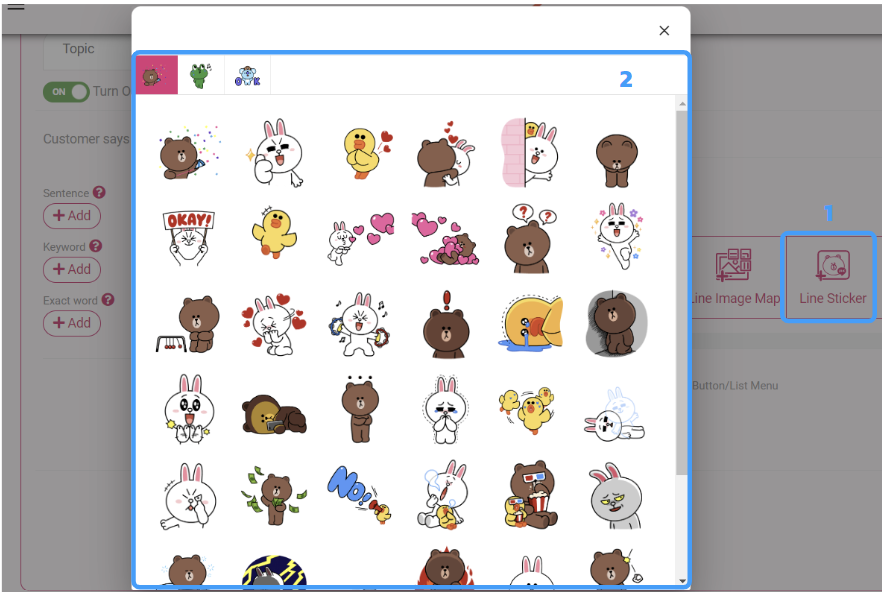
- Add item “LINE Sticker”.
- Choose Line Sticker.
- Press “Send”.
5.3.14 Allow Marketing Messages
If you want to send a Special Broadcast (Marketing Messages), you have to send this item to your customer to get messages first.
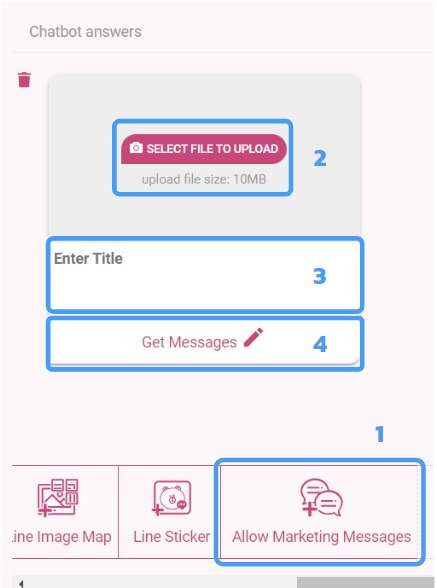
- Add item “Allow Marketing Messages”
- Select file to upload.
- Enter title.
- Select button.
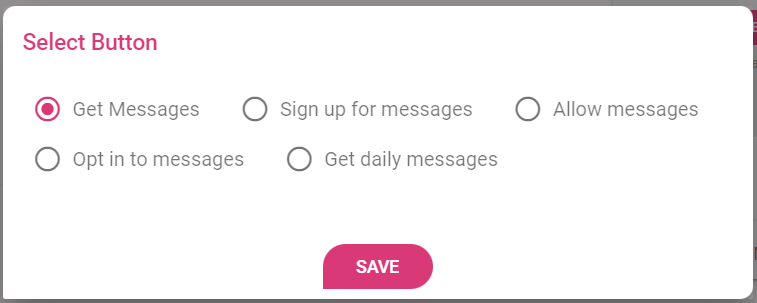
- Press “SAVE”.
Step 6 : Choice

Click to show/hide
🌟How to Set Up?
Choice is the guideline words for customers. So customers don’t have to type but can easily press “choice” to get the faster answer.
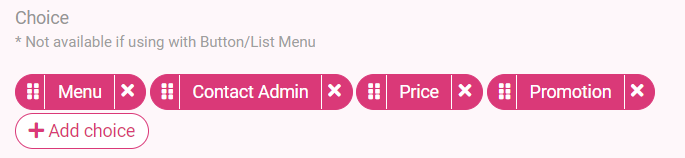
- Press the “Add Choice” button.
- Type a common word as an option for the person who messaged you. (Limited to 20 characters per choice word).
Step 7 : Reply Comment

Click to show/hide
🌟How to Set Up?
The Logic of Reply Comment is same as Conversation, but has some details difference.
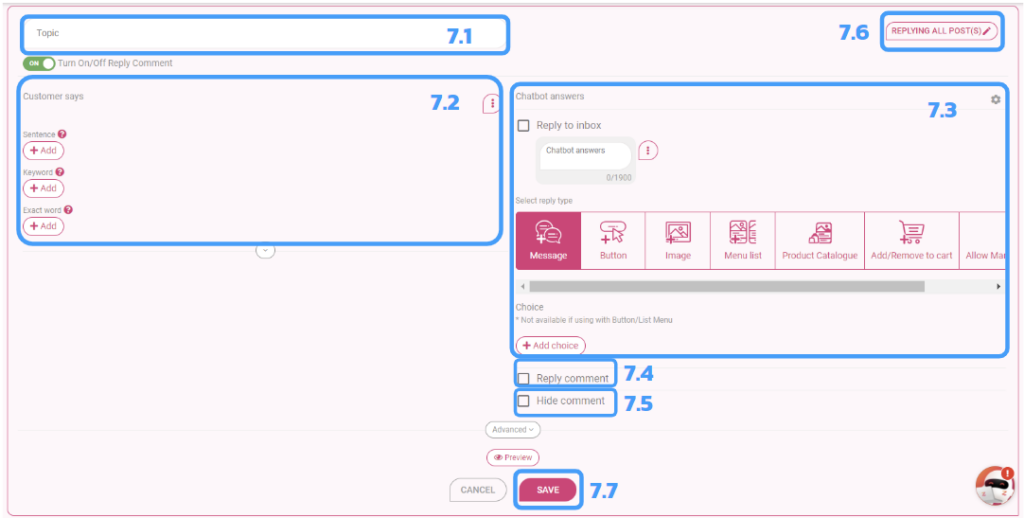
7.1 Name the Topic.
7.2 Setting up the messages that customers comment. (Left side)
7.3 Reply to inbox : Set up a messages for the store to reply the comment to inbox.
- Add items.
- Add Choice.
7.4 Reply Comment : Set up a message to reply to customer’s comment undet the post. (Normal Post, Ads Post, Live Posts)
7.5 Hide Comment : Set up a comment you want to hide such as spams.
7.6 Replying all Post(s)
7.6.1 Replying all post(s) : All posts are replied.

7.6.2 Replying selected post(s) : Selected posts are replied.
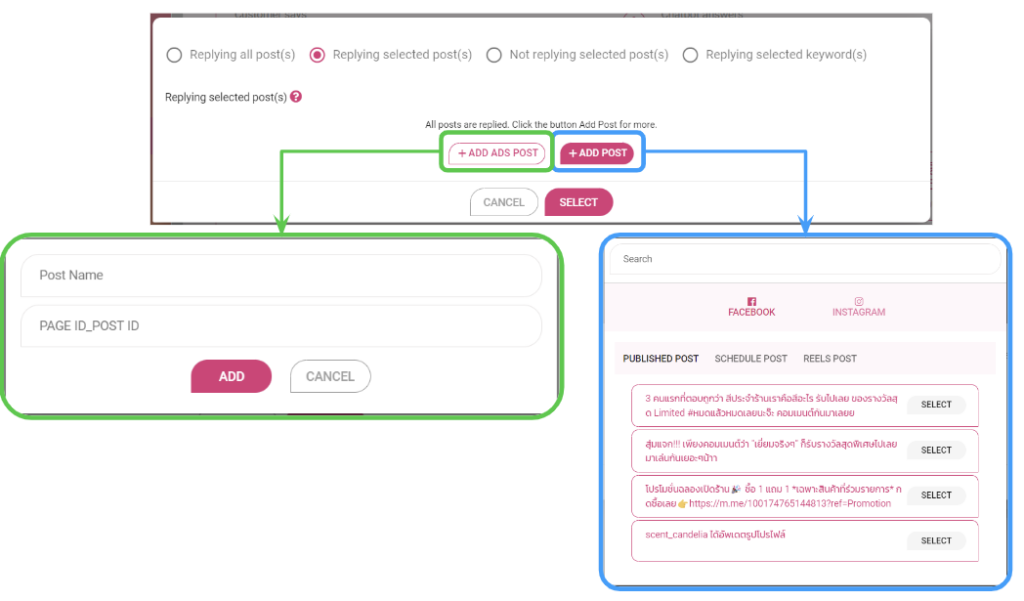
- +Add Post : You can select Facebook or Instagram posts and Published Post, Schedule Post, or Reels Post.
- +Add Ads Post : Enter Post Name and your Page ID_Post ID. Then click ADD.
- Press “Select”.
7.6.3 Not replying selected post(s) : Selected posts aren’t replied.
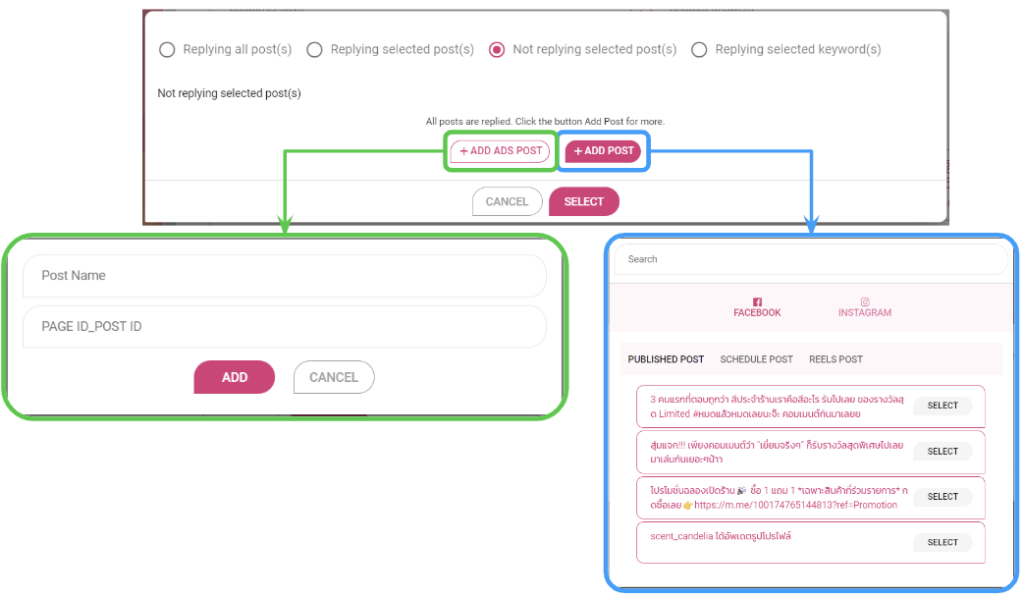
- +Add Post : You can select Facebook or Instagram posts and Published Post, Schedule Post, or Reels Post that you don’t want to reply.
- +Add Ads Post : Enter Post Name and your Page ID_Post ID. Then click ADD for not replying.
- Press “Select”.
7.6.4 Replying selected keyword(s) : Reply only posts with keywords.
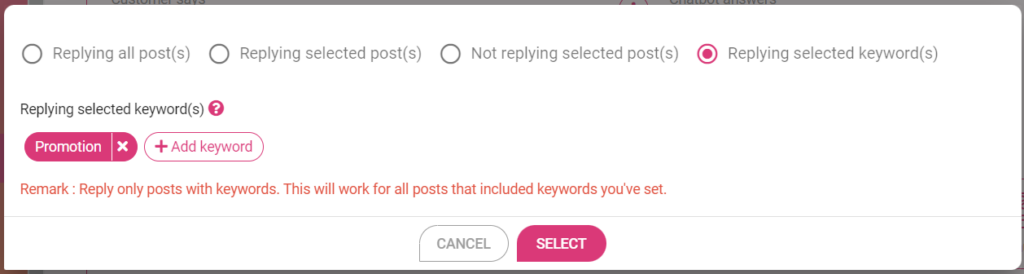
- Add keyword.
- Press “Select”.
Step 8 : Shop/Salepage
Click to show/hide
🌟How to Set Up?
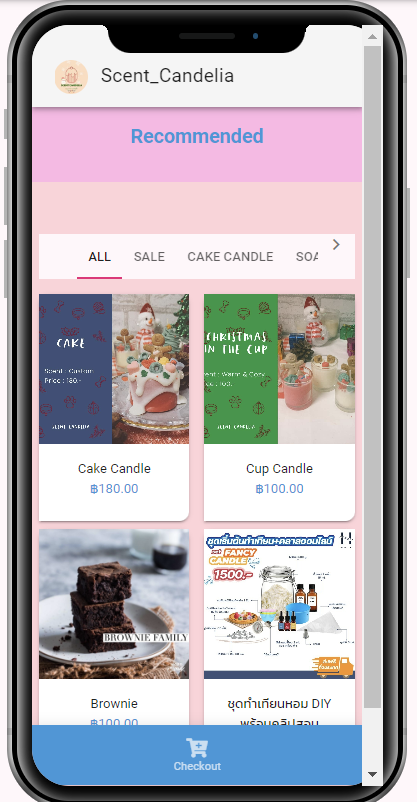
8.1 Shop Profile
You can set up shop profile here.
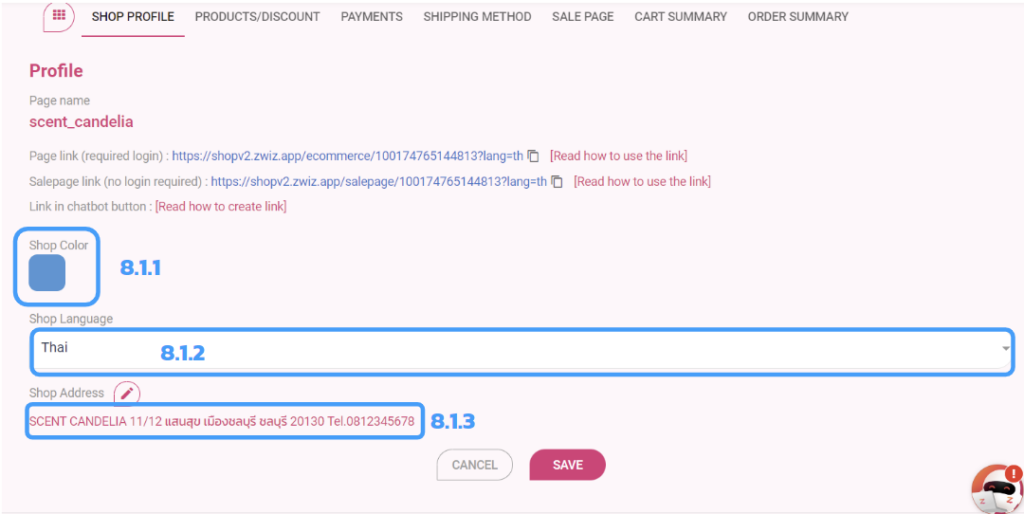
8.1.1 Select Shop Color
8.1.2 Select Shop Language
8.1.3 Set up Shop Address
8.2 Products/Discount
PRODUCT
Add category, products, and product details
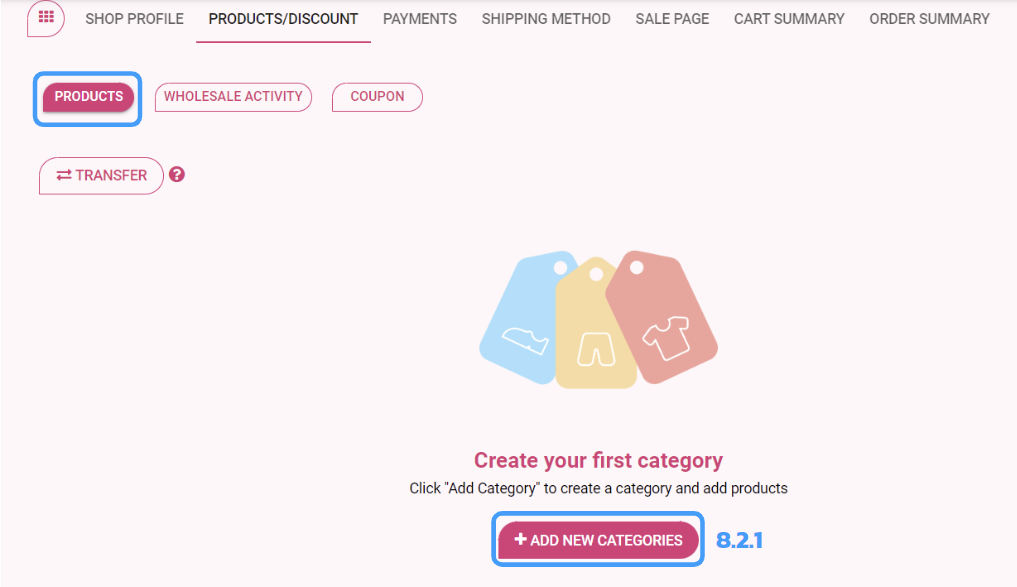

8.2.1 Add New Categories
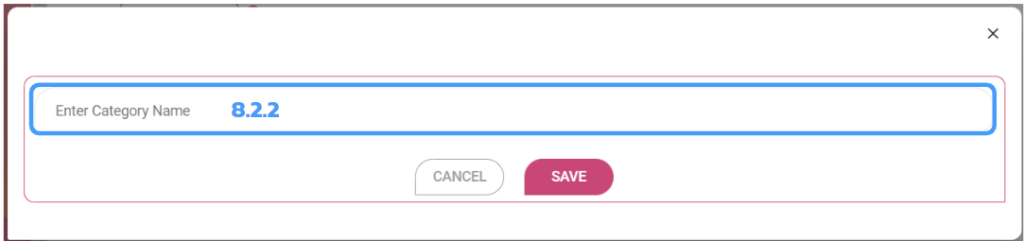
8.2.2 Enter Category Name. >> Press “SAVE”.

Add more new categories.
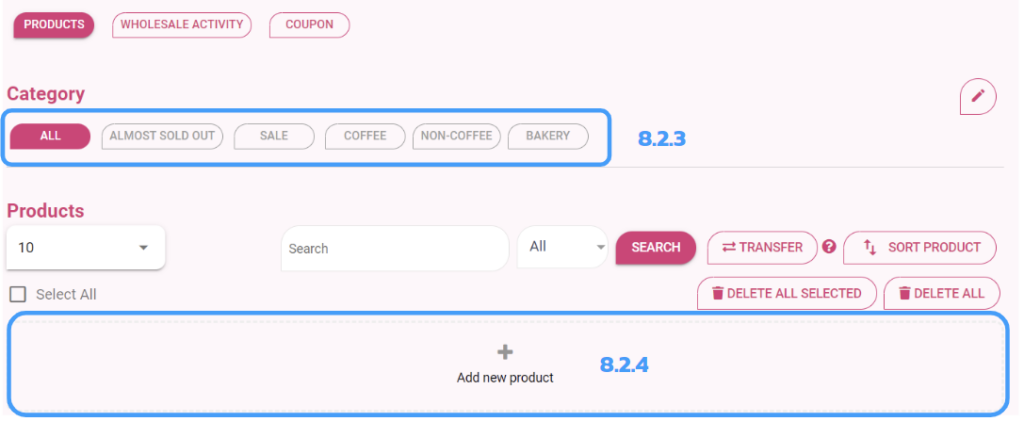
8.2.3 Select Categories.
8.2.4 Add new product.
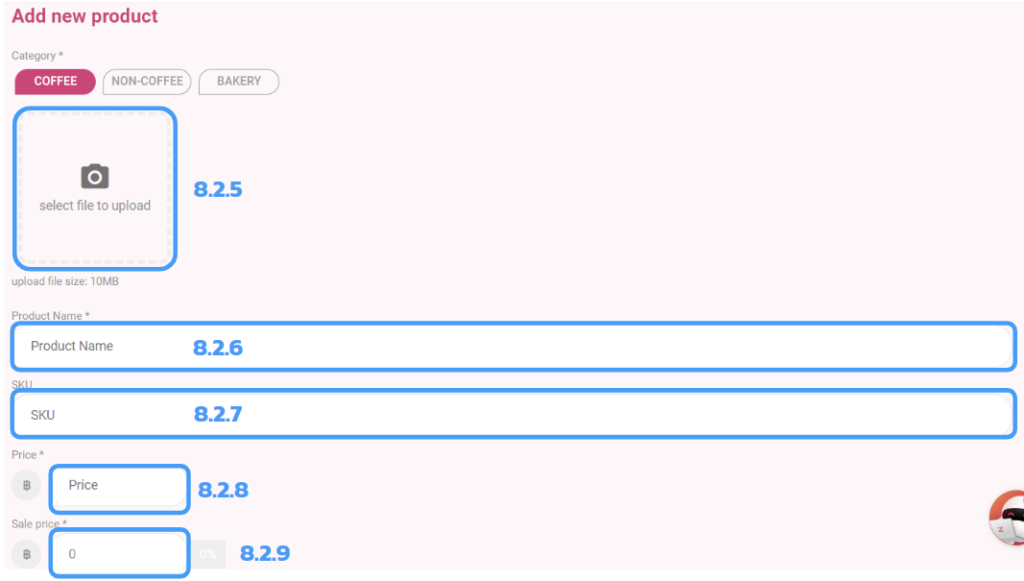
8.2.5 Upload product’s image.
8.2.6 Enter Product Name.
8.2.7 Enter Product’s SKU.
8.2.8 Enter Price.
8.2.9 Enter Sale Price.
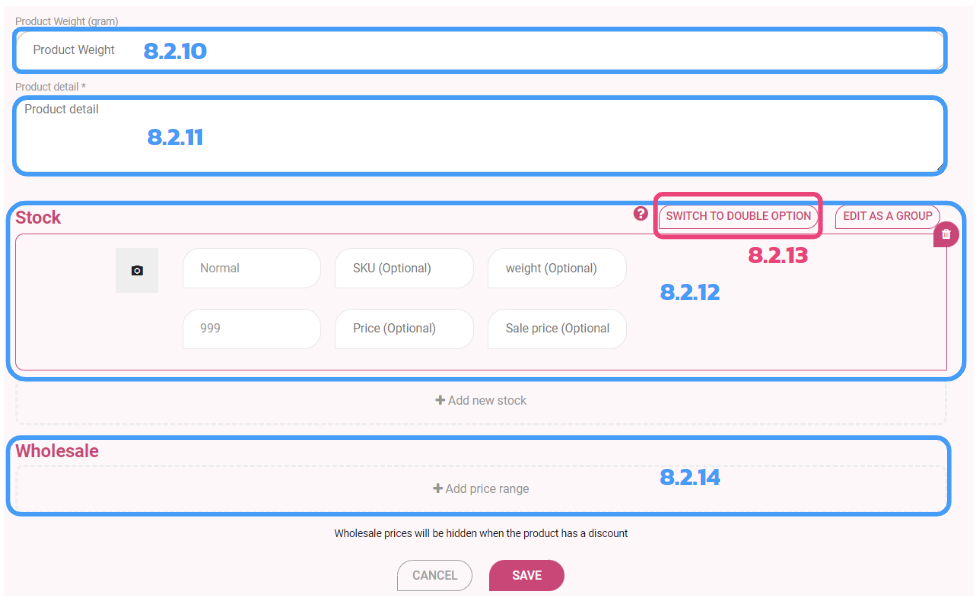
8.2.10 Enter Product Weight
8.2.11 Enter Product Detail
8.2.12 Add Stock
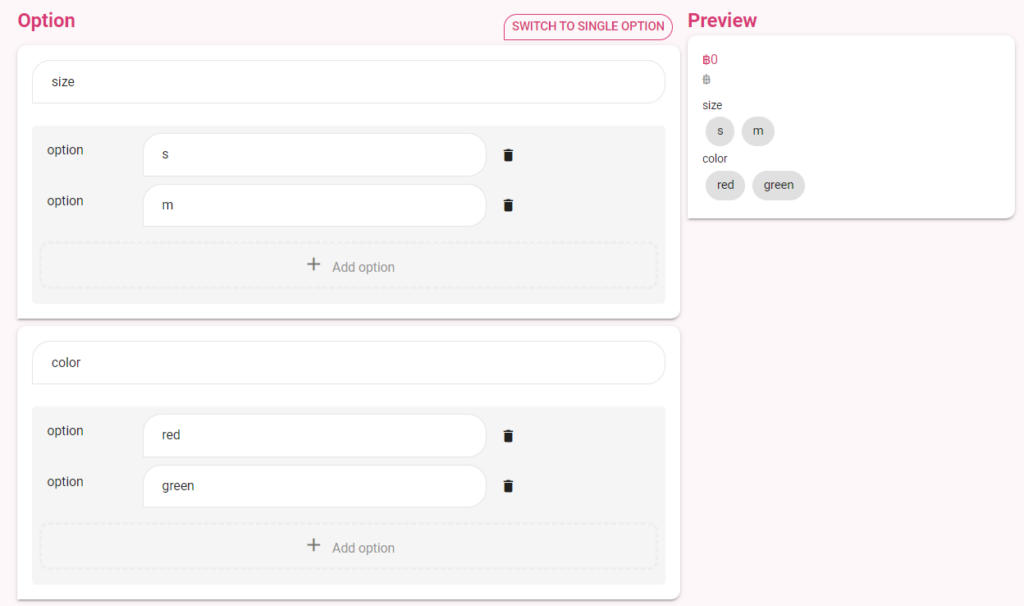
8.2.13 You can Switch to Double Option (some products)
8.2.14 If you have a Wholesale Price, Add price range.
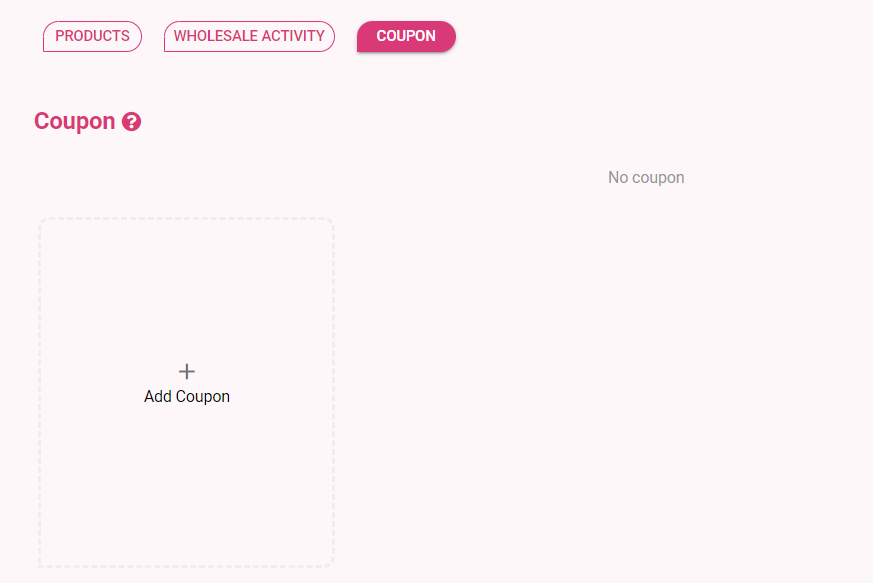
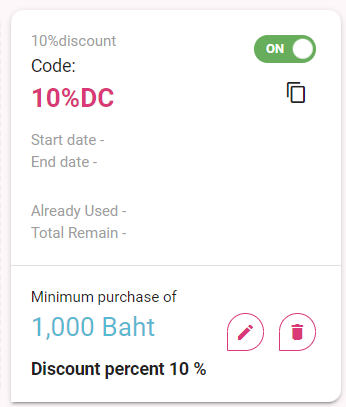
COUPON
Add Coupon
Enter Details
1. Coupon Info
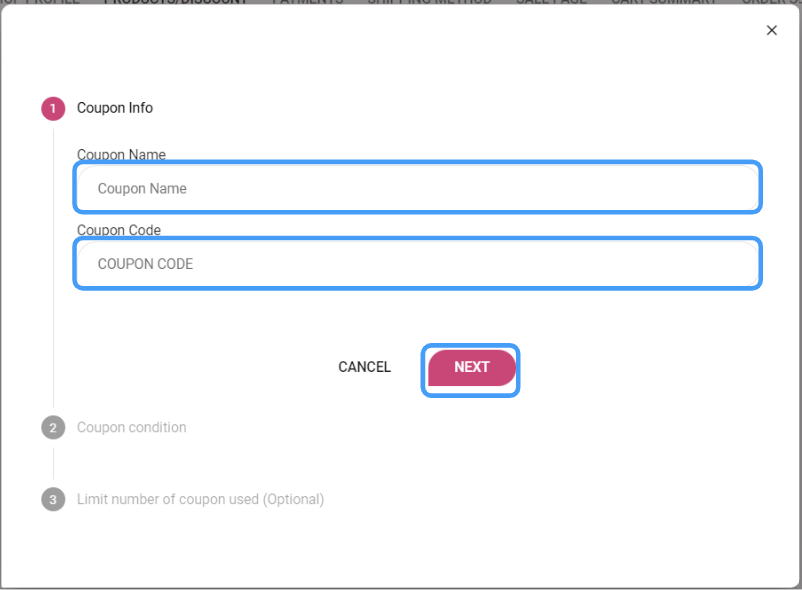
- Enter Coupon Name.
- Enter Coupon Code.
- Press “NEXT”.
2. Coupon Condition
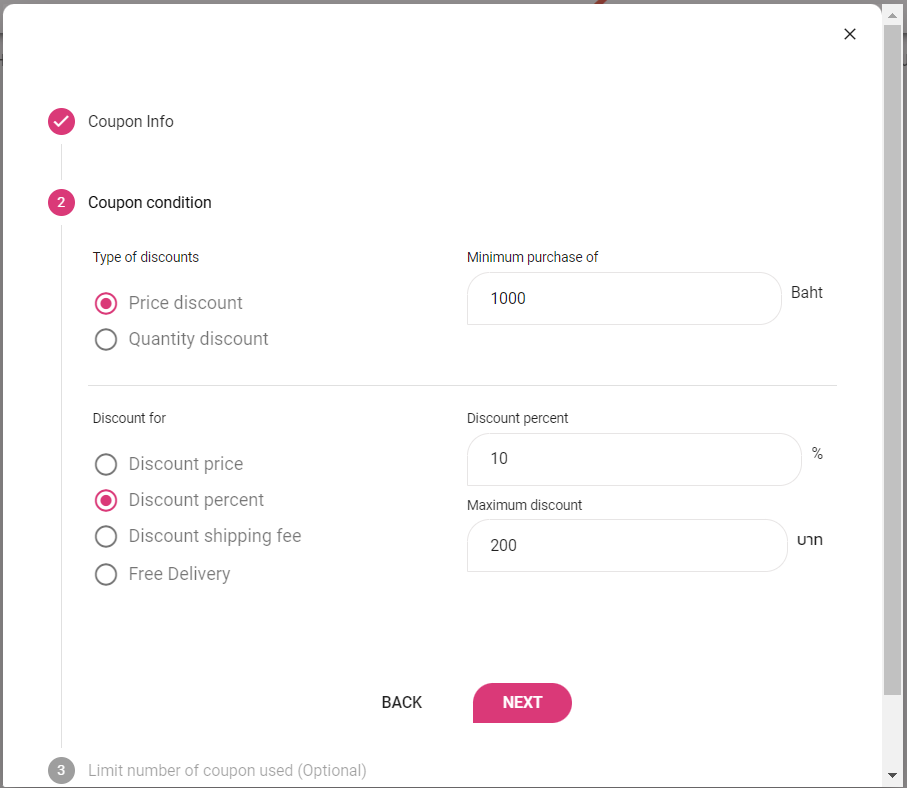
- Choose Type of discounts : Price discount / Quantity discount.
- Discount for : Discount price / Discoint percent / Discount shipping fee / Free Delivery.
- Press “NEXT”.
3. Limit Number of Coupon Used (Optional)
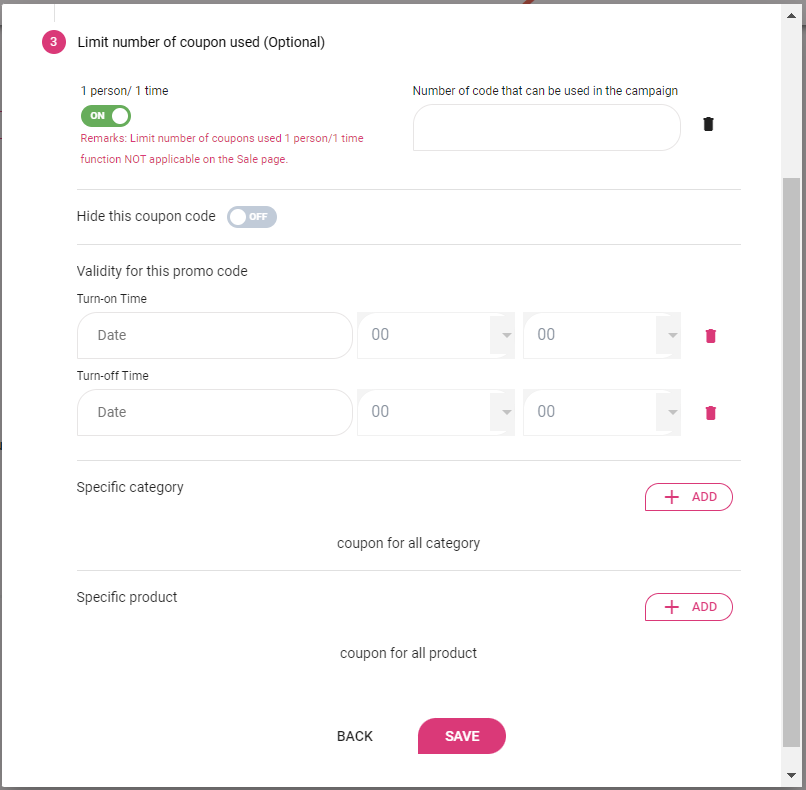
- Turn toggle ON / OFF for 1 person per 1 time.
- Enter the number of code that can be used in this campaign. (Optional)
- Turn toggle ON / OFF for hiding this promo code.
- Enter Validity for this promo code : Turn-on & Turn-off Time.
- Add Specific Category and Product.
- Press “SAVE”
This is the result.
8.3 Payments
Bank Transfer
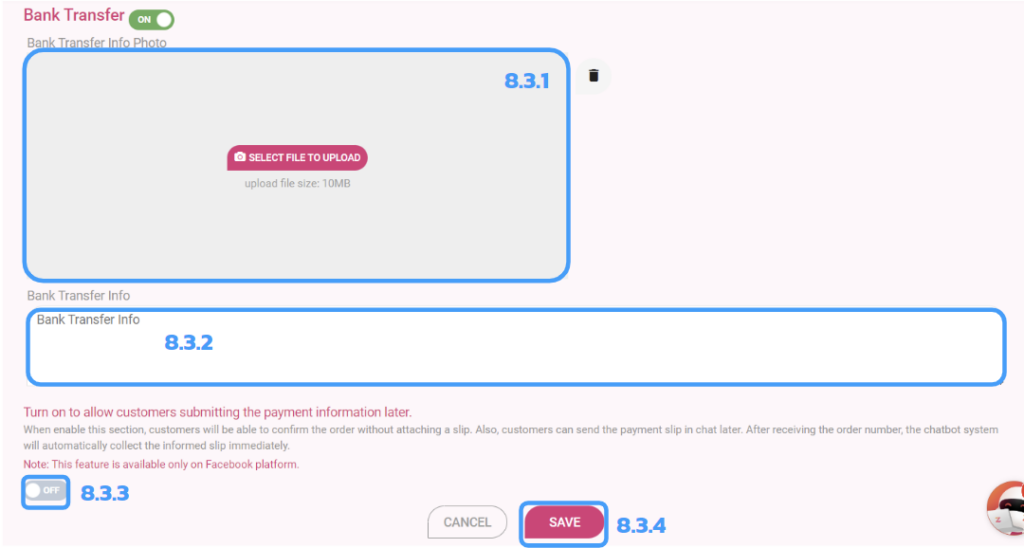
8.3.1 Upload Bank Transfer Info Photo.
8.3.2 Enter Bank Transfer Info.
8.3.3 Turn toggle ON to allow customers submitting the payment information later. (NOTE : This feature is available only on Facebook platform.)
8.3.4 Press “SAVE”.
Auto Verify Slip (Transfer Channels)
If this feature is enabled, chatbot will verify accuracy of pay slip as the customer payment from merchant’s specified bank accounts.
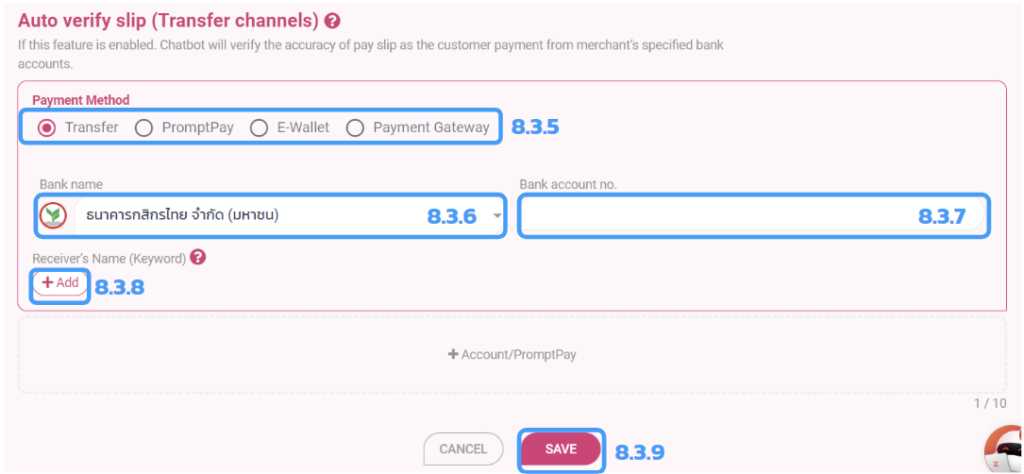
8.3.5 Select Payment Method : Transfer / PromptPay / E-Wallet / Payment Gateway.
8.3.6 Select Bank Name.
8.3.7 Enter Bank Account No.
8.3.8 Add Receiver’s Name. (Keyword)
8.3.9 Press “SAVE”.
Credit Card

To active credit payment, click “Link PayPal Account”
Meta Pay
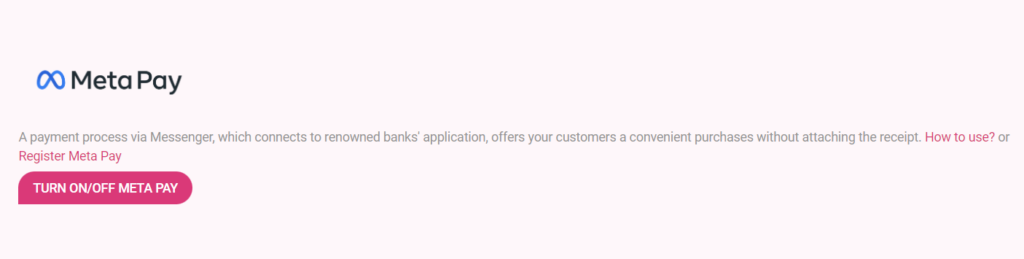
Meta Pay is a payment process via Messenger, which connects to reowned bank’s application, offers your customers a convenient purchases without attaching the receipt.
GB Prime Credit Card
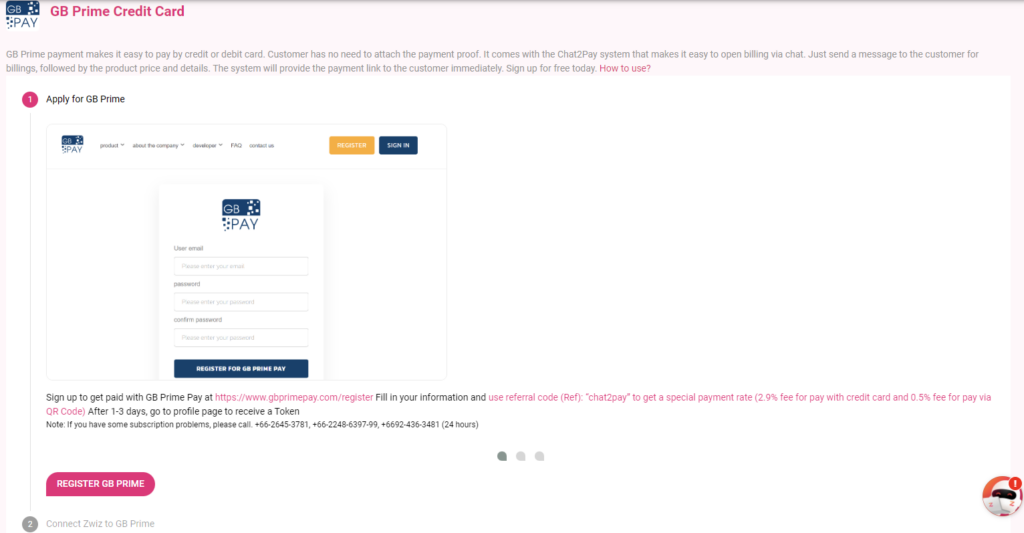
GB Prime Payment makes it easy to pay by credit or debit card. Customer no need to attach the payment proof. It comes with the Chat2Pay system that makes it easy to open billing via chat. Just send a message to the customer for billings, followed by the product price and details. The system will provide the payment link to the customer immediately.
- First, Register GB Prime.
- Then, Connect Zwiz to GB Prime.
Pay Solutions
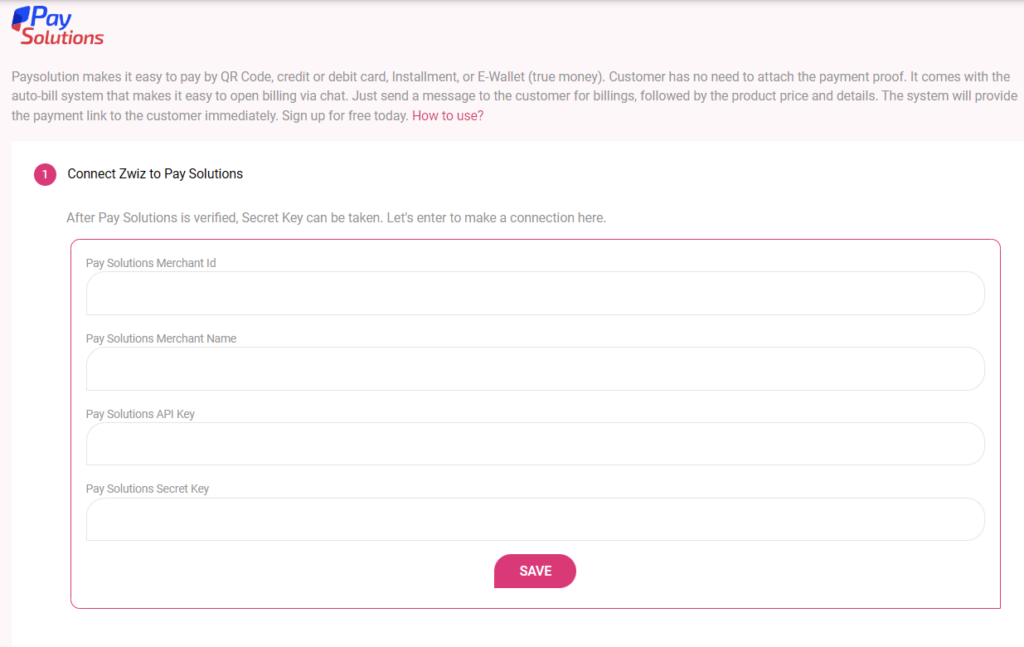
Pay Solutions makes it easy to pay by QR Code, credit or debit card, Installment, or E-Wallet (true money). Customer has no need to attach the payment proof. It comes with the auto-bill system that makes it easy to open billing via chat. Just send a message to customer for billings, followed by the product price and details. The system will provide the payment link to the customer immediately.
8.4 Shipping Method
Main Shipping
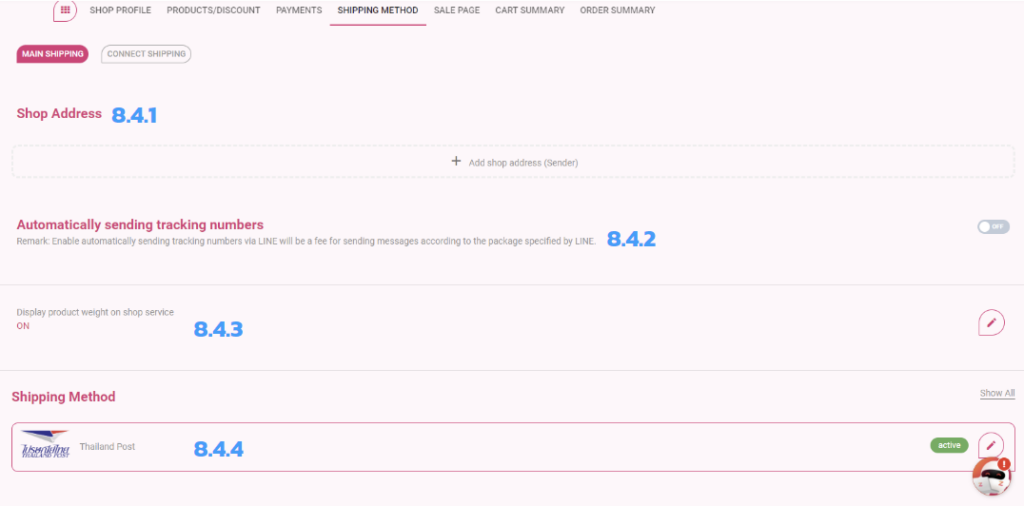
8.4.1 Add Shop Address.
8.4.2 Turn toggle ON if you want to send tracking number auto.
8.4.3 Turn toggle ON if you want to display product weight on shop service.
8.4.4 Shipping Method
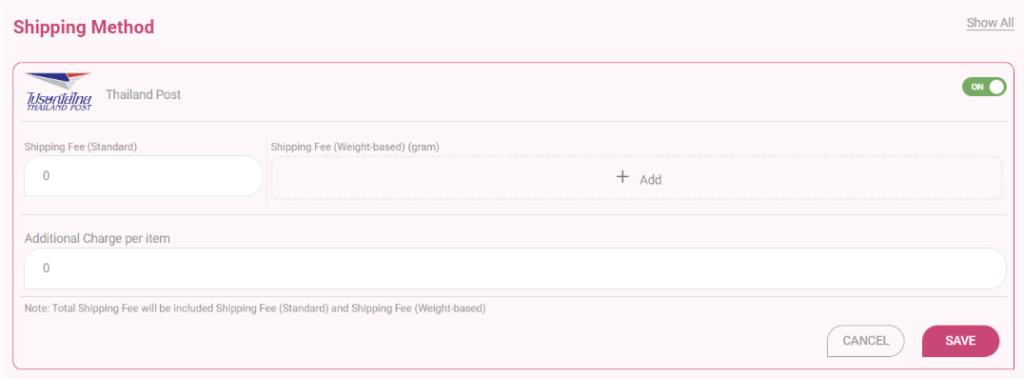
- Add Shipping Fee
- Additional Char per item
- Press “SAVE”
8.5 Sale Page
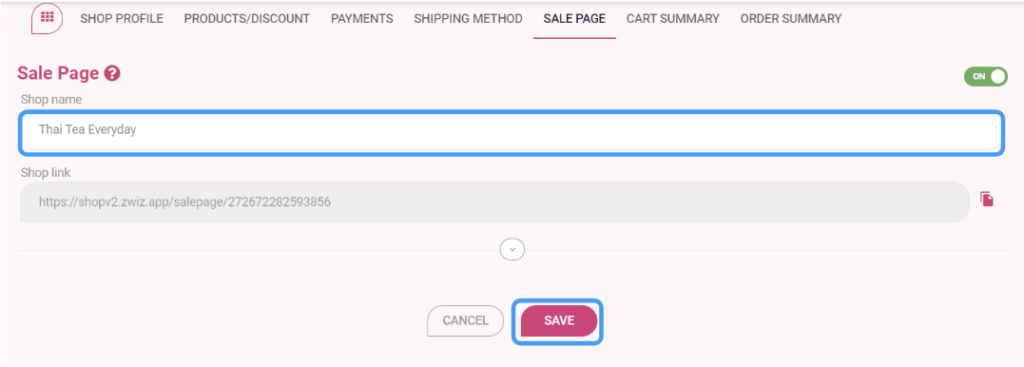
- Enter Shop Name.
- Press “SAVE”.
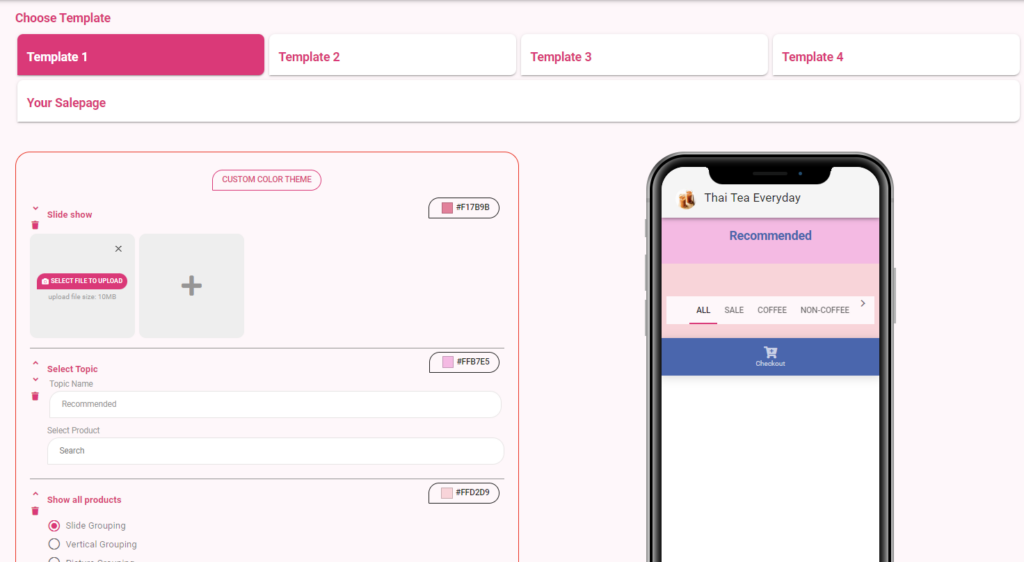
- Select Template 1-4.
- Decorate your Salepage.
- Press “SAVE”.
8.6 Cart Summary
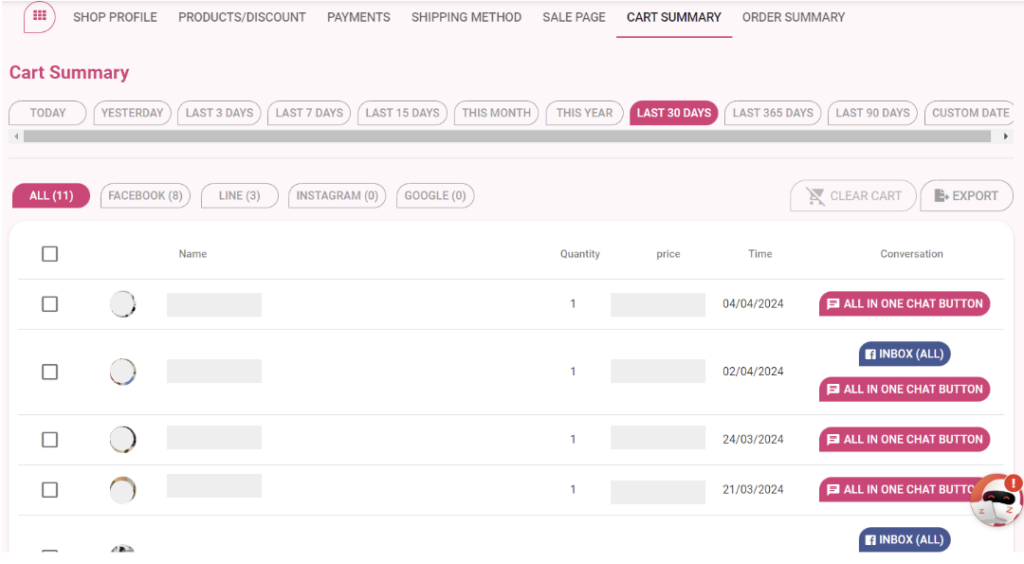
- You can filter date and platform.
- Cart Summary show you customer’s name, quantity of the product they bought, price, time, and lead you to the conversation.
- Can export file.
8.7 Order Summary
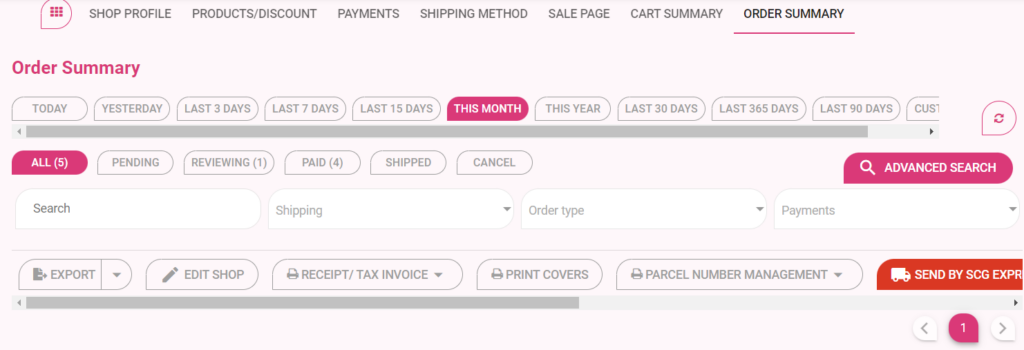
- You can filter date and status.
- You can search orders, filter by shipping, order type, or payment.
- Can Export details, edit shop, receipt / tax invoice, print covers, manage parcel number, print label sent by any shippings.
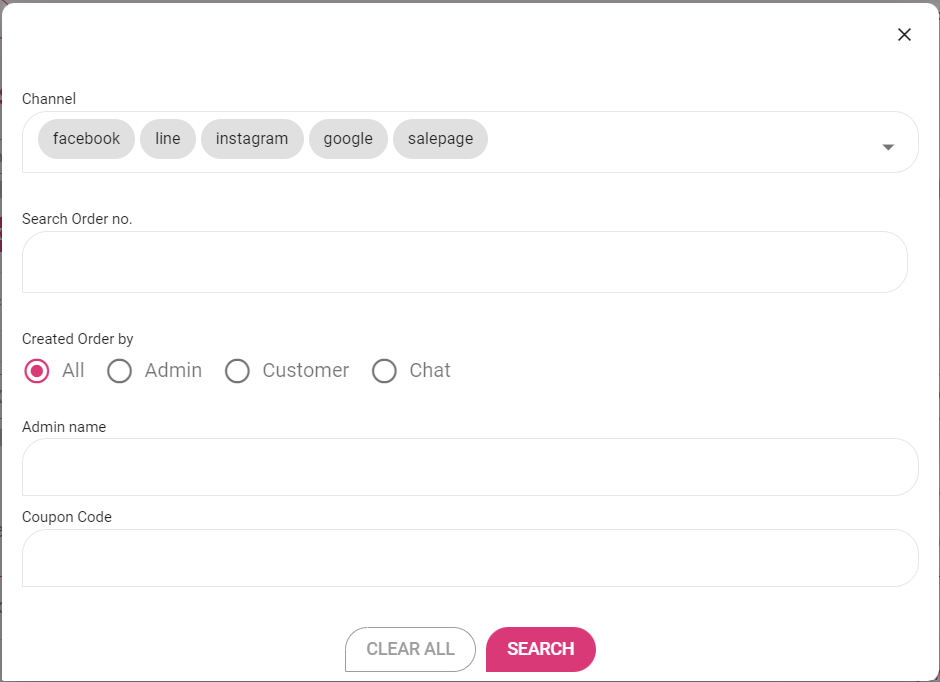
- Or you can use “Advanced Search” : Select Channel, search Order no., Cteated Order by?, Admin name, or Coupon Code.
- Press “SEARCH”.
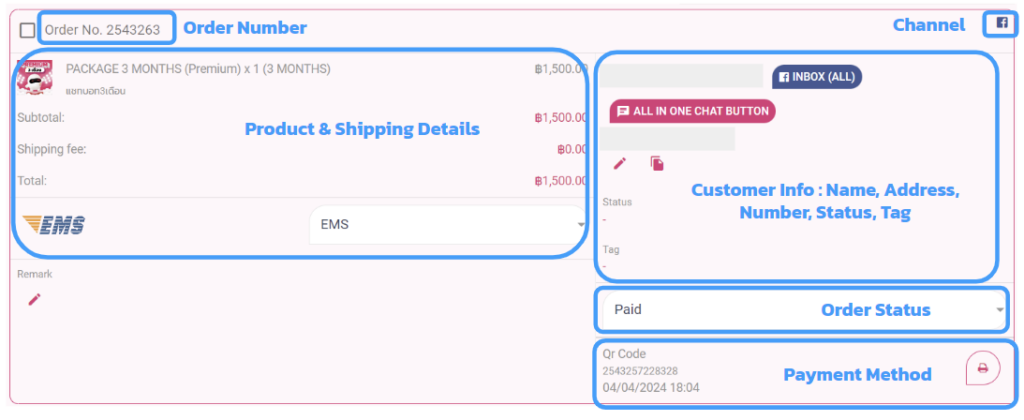
- Order Number
- Product & Shipping Details
- Channel
- Customer Info : Name, Address, Number, Status, Tag
- Order Status
- Payment Method
Step 9 : Analytics
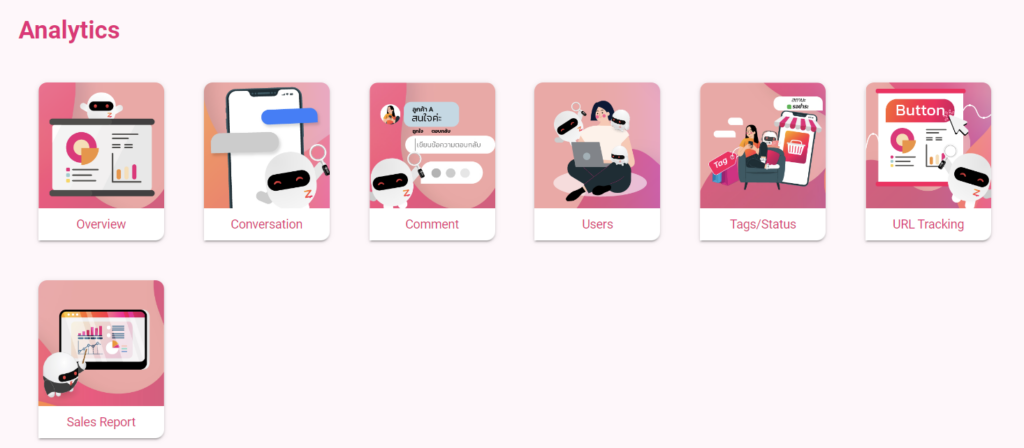
Click to show/hide
9.1 Overview
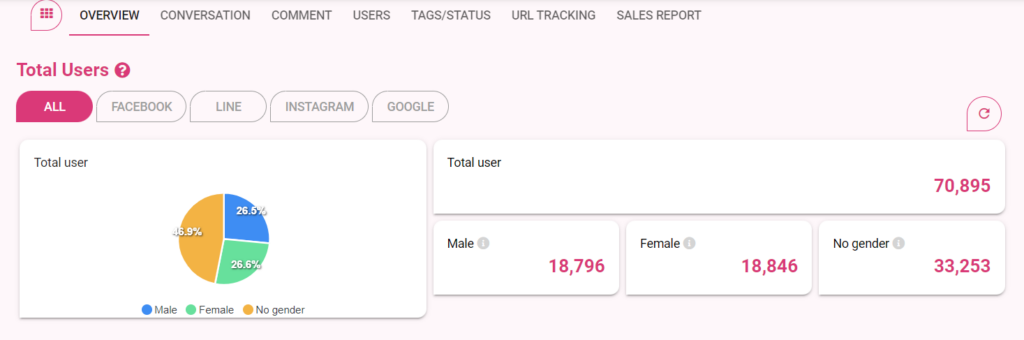
- It shows Total Users in Pie Chart and Number.
- Filter by channels.
- Separate Gender.
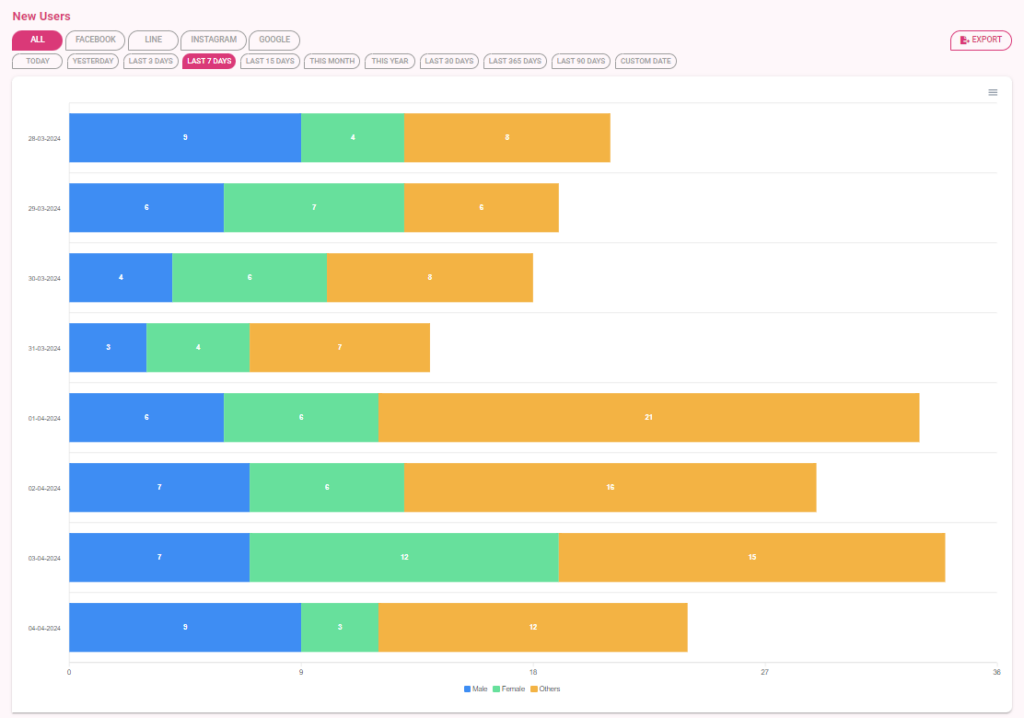
- You can see the number of new users filter by channels and date in bar chart.
- Blue Color = Male, Green Color = Femake, Yellow Color = Others.
- Can export file.
9.2 Conversation
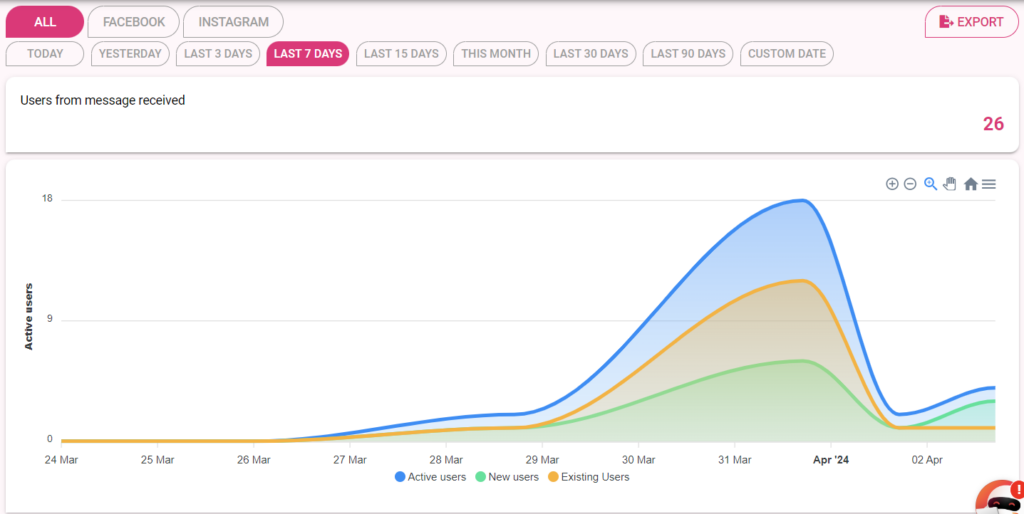
9.2.1 By Users
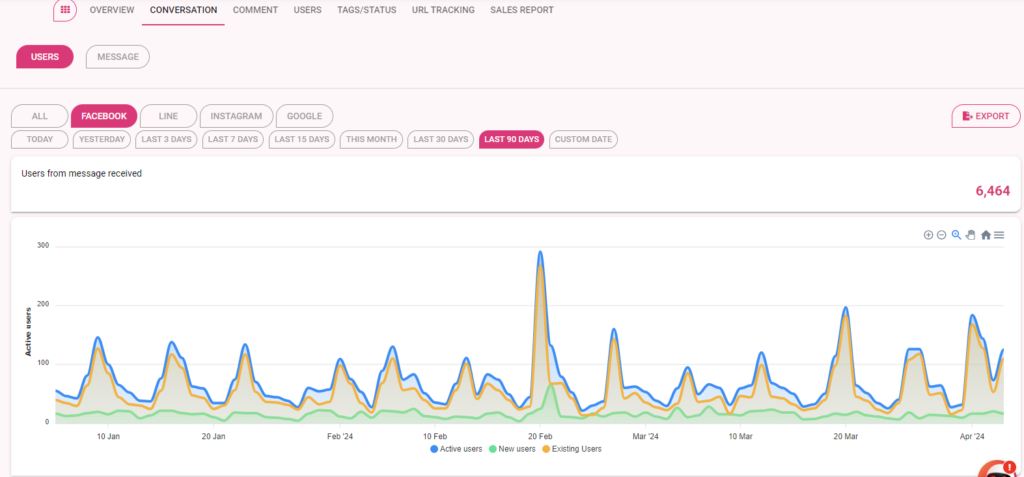
- This page shows you a curve chart of active users, new users, and existing users by date and channels.
- Shows number of users from message received.
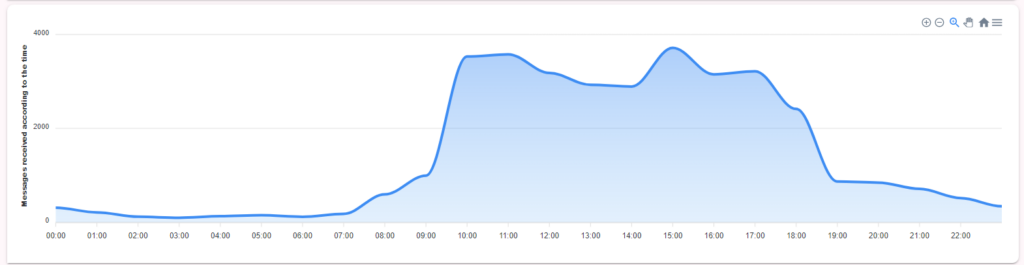
- Shows messages received according to the time of the day.
9.2.2 By Message
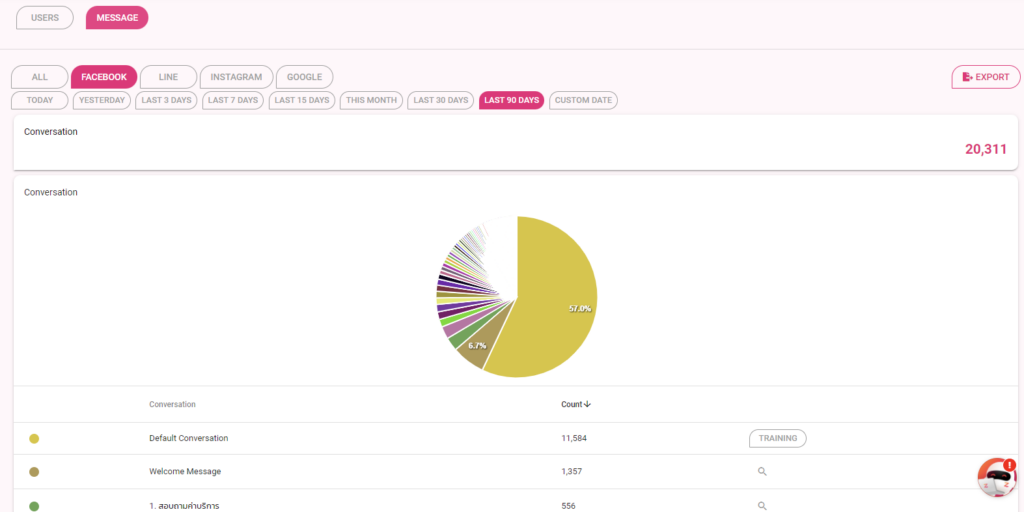
- This page shows the conversations by channels and date in pie chart.
9.3 Comment
9.3.1 By Users
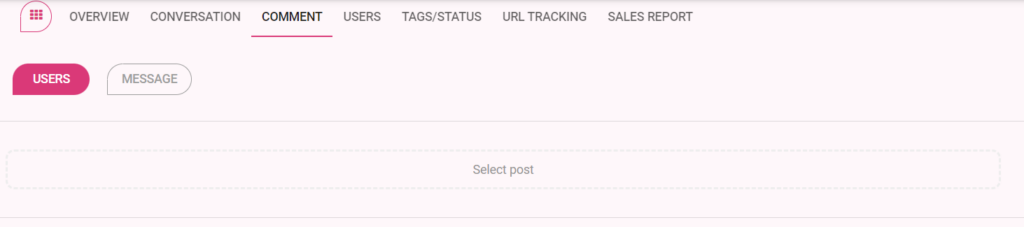
- You can select post or not.
- This page shows you a curve chart of active users, new users, and existing users by date and channels.
- Shows number of users from message (comment) received.

- Shows messages (comments) received according to the time of the day.
9.3.1 By Message

- This page shows number and 3 pie charts according to 3 types of comment : Reply comment, Reply to inbox, and Hide comment that filter by channel and date.
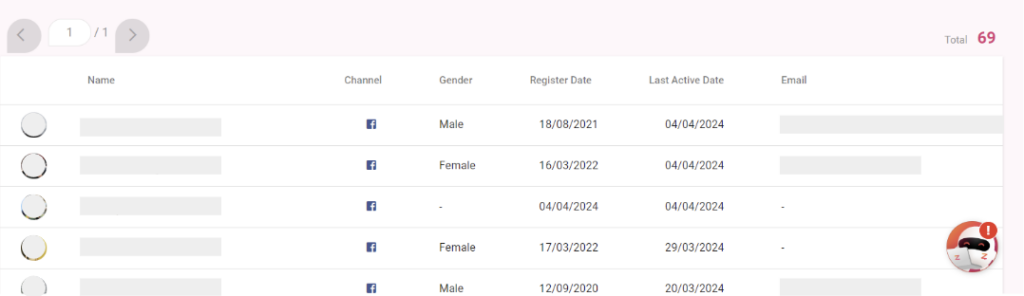
9.3 Users
This page shows you all users info. Can Filter by Channels, import previous users and export users.
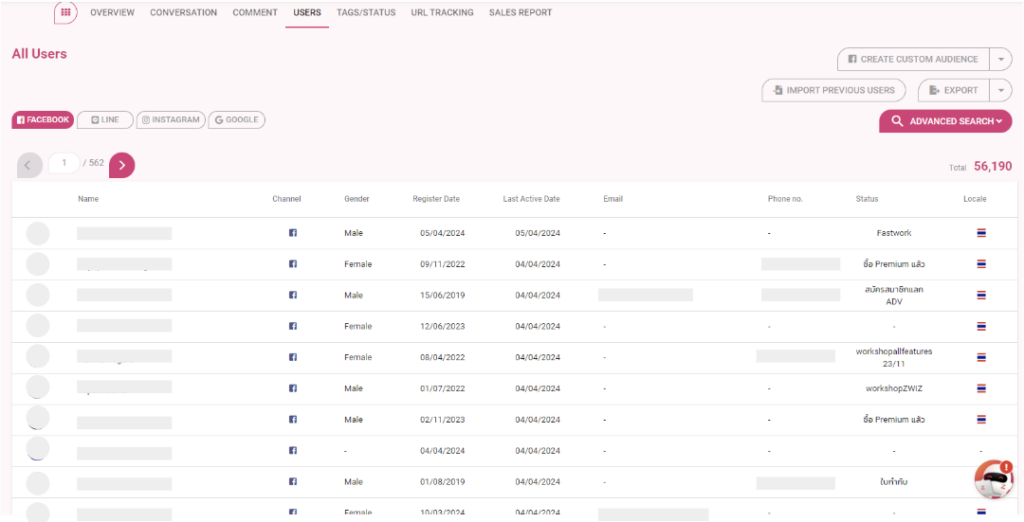
- Name
- Channel
- Gender
- Register Date
- Last Active Date
- Phone No.
- Status
- Locale
- Order Quantity
- Total Purchase Amount
- First Time Purchase
- Latest Purchase
Moreover, you can create Custom Audience by pressing “Advanced Search”
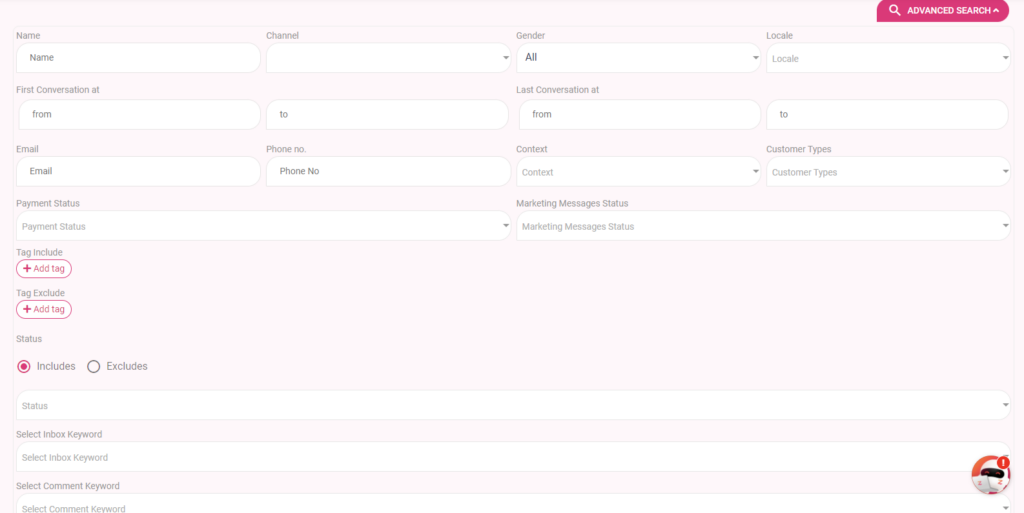

As the image above, you can filter user by name, channel, gender, payment status, tag, etc.
Then, press “SEARCH”.
Total number of users changed.
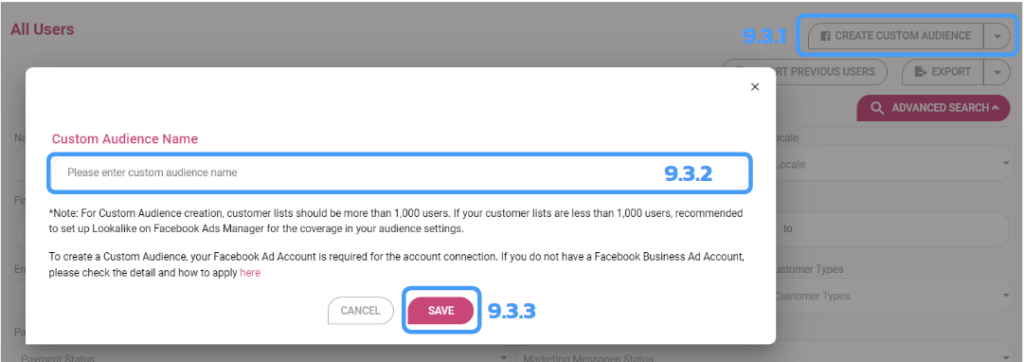
Next step,
9.3.1 Press “Creste Custom Audience”
9.3.2 Name Custom Audience
3.3.3 Press “SAVE”
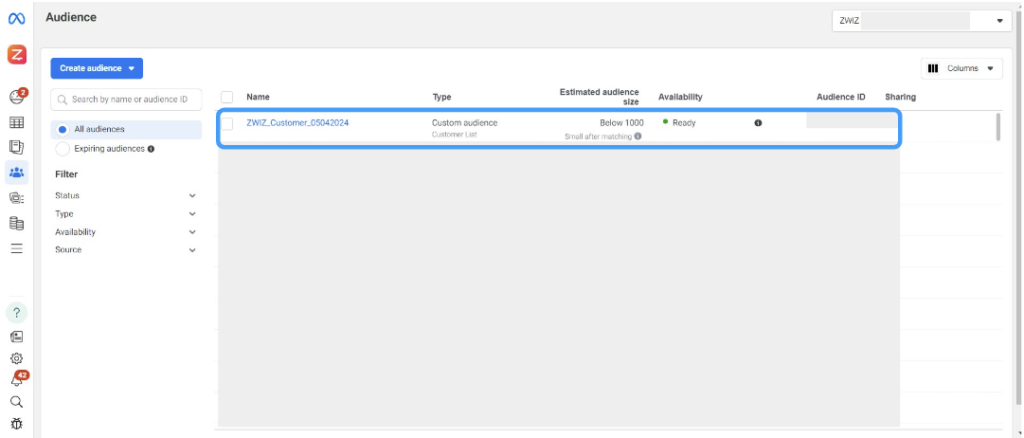
Custom Audience from Zwiz.AI will automatically link to Facebook Ad Account (Custom Audience name from Zwiz.AI will start from ZWIZ_)
9.4 Tags/Status

You can manage Tags and Status from this page, Add or Delete.
9.5 URL Tracking
This feature allow you to track total users who click the button to the website.
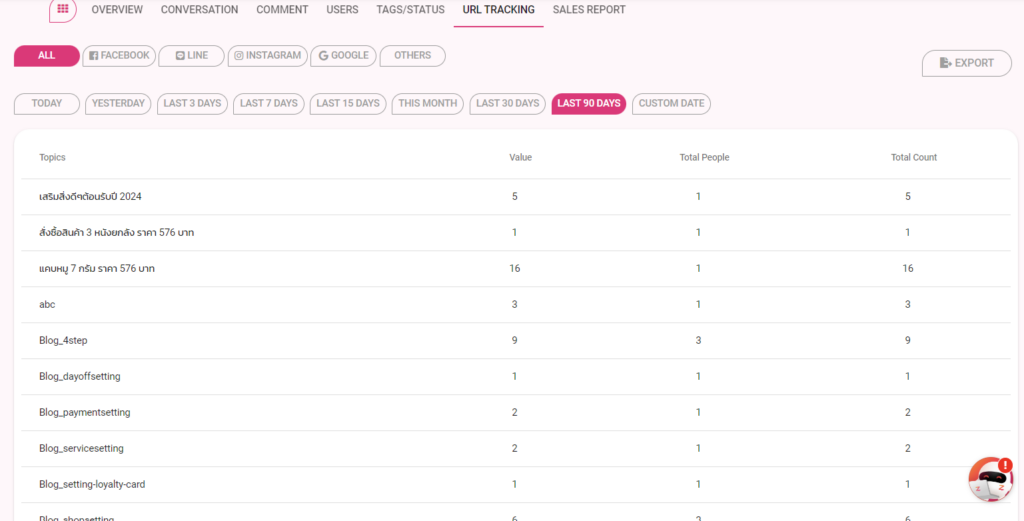
You can filter users by channels and date. And this page will show data as the image above.
- Topics
- Value
- Total People
- Total Count
Moreover, you can export data.
9.6 Sales Report
This page shows all sales report that you can filter by date and export file.
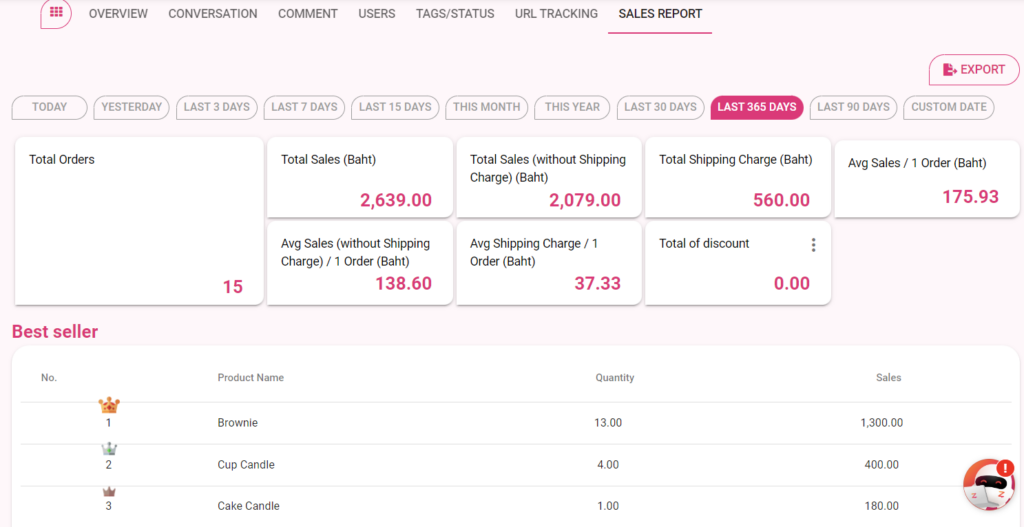
- Total Orders
- Total Sales (Baht)
- Total Sales (without Shipping Charge) (Baht)
- Total Shipping Charge (Baht)
- Avg Sales / 1 Order (Baht)
- Avg Sales (without Shipping Charge) / 1 Order (Baht)
- Avg Shipping Charge / 1 Order (Baht)
- Total of discount
- Best Seller : No. / Product Name / Quantity / Sales
Install now!
If you have questions or need help
from our team.
please contact the ZWIZ PHILIPPINES page.